HiveMQ Extension Development
Introduction
The HiveMQ ecosystem consists of numerous open-source and commercial tools and solutions that make it possible to move data from device to cloud in a secure, reliable, and scalable manner.
The HiveMQ open-source platform includes the open HiveMQ Extension SDK, HiveMQ Community Edition (CE), our MQTT Client library, and other tools.
The HiveMQ enterprise platform includes the HiveMQ Enterprise Extension SDK, the professional and enterprise editions of HiveMQ, and several powerful enterprise extensions.
Our flexible extension framework provides an open API that allows developers to create custom extensions that suit their specific infrastructures. The HiveMQ extension framework gives you the ability to seamlessly augment HiveMQ broker functionality with custom business logic. Use the framework to integrate HiveMQ with virtually any external system. The superior extensibility of HiveMQ ensures that your MQTT broker is able to deliver the right fit for your particular environment.
HiveMQ Community Extension SDK
The open HiveMQ extension framework adds many types of functionality:
-
Intercept and manipulate MQTT messages
-
Integrate other services
-
Collect statistics
-
Add fine-grained security
-
and much more
For more information, see HiveMQ Community Extension SDK Services.
HiveMQ Enterprise Extension SDK
The enterprise version of our extension SDK enriches the HiveMQ Extension SDK with additional functionality that supports features of the HiveMQ professional and enterprise versions:
-
Add custom views to your HiveMQ Control Center
-
Improve cluster communication
-
Implement fine-grained user access to the HiveMQ Control Center
-
Achieve scalable and reliable processing of incoming MQTT messages
-
and much more
For more information, see HiveMQ Enterprise Extension SDK Services.
The HiveMQ Enterprise SDK makes it possible to integrate HiveMQ into your existing enterprise system in a way that can accommodate even the most demanding use cases without compromising HiveMQ’s outstanding reliability and scalability. The signature module of the enterprise SDK protects the integrity of your code.
Ways to Explore the HiveMQ Extension Framework
The best way to begin extension development for HiveMQ is to follow our Quick Start Guide for HiveMQ Extension Developers.
If you prefer to learn from real-world extensions, visit the HiveMQ Github page and the HiveMQ Marketplace to access pre-built HiveMQ extensions that the HiveMQ team and HiveMQ community have created.
For in-depth information about the HiveMQ Extension SDK, advanced extension developers can jump directly to the HiveMQ API JavaDoc or our detailed Services and Registries documentation.
Prerequisites
All you need to start developing a custom HiveMQ extension is a basic understanding of the Java programming language and the following two components:
-
OpenJDK 11 or newer
Quick Start Guide for HiveMQ Extension Developers
Once you understand the core concepts, extension development for HiveMQ is as easy as writing a Java main method. This quick start guide covers all the basics that you need to get started with extension development for HiveMQ.
HiveMQ extensions can interact with the MQTT broker in various ways:
-
Use the Services API to interact with HiveMQ and connected MQTT clients
-
Register callback classes that HiveMQ calls when a specific event occurs
-
Inspect and manipulate MQTT-related data such as sessions, retained messages, subscriptions, and more
-
Implement fine-grained authentication and authorization for MQTT clients
-
Add a custom cluster-discovery mechanism
-
Extend HiveMQ with custom business logic
These capabilities allow you to fulfil many popular use cases. For example, write messages to a database, integrate service busses, collect statistics, or add fine-grained security.
HiveMQ Extension Basics
A HiveMQ extension is a simple program that is written in Java, OpenJDK version 11 or higher, and uses the HiveMQ Extension SDK to interact with the HiveMQ MQTT broker.
| HiveMQ 3 Plugins are not compatible with HiveMQ 4. |
Extension Structure
Each HiveMQ extension is a folder that contains at least one Java archive (.jar) and an XML descriptor file (hivemq-extension.xml).
|- hello-world-extension/  (1)
|   |- hello-world-extension-1.0.0.jar  (2)
| |- hivemq-extension.xml (3)| 1 | The name of the extension folder. This name must match the ID in your XML descriptor file |
| 2 | The Java archive (.jar file) that contains the Java classes that implement the logic of the extension |
| 3 | The XML descriptor file that contains additional information and metadata for the extension |
The Java archive contains all the compiled code of the extension. This code implements the logic that HiveMQ loads and executes. HiveMQ extension skeletons are preconfigured with everything that is needed to automatically create the XML-descriptor file from the source code of the extension.
Extension Metadata
The HiveMQ Extension SDK uses the hivemq-extension.xml to store meta information and the priority level of the extension.
The priority that you assign to an extension defines the order in which HiveMQ executes the extension. If multiple extensions are installed, the extension with the highest priority executes first.
We strongly recommend that you fill in all of the metadata that is requested in the hivemq-extension.xml file.
HiveMQ logs the information when the extension loads and the information is useful for monitoring and debugging purposes.
|
<hivemq-extension>
    <id>hello-world-extension</id> (1)
    <name>Hello World Extension</name> (2)
    <version>1.0-SNAPSHOT</version> (3)
    <priority>1000</priority> (4)
    <start-priority>1000</start-priority> (5)
    <author>HiveMQ-GmbH</author> (6)
</hivemq-extension>| 1 | The extension identifier. This identifier must be unique across all HiveMQ extensions that are installed on a HiveMQ installation. |
| 2 | The name of the extension. HiveMQ displays this name for the extension throughout the HiveMQ installation. |
| 3 | The version of the extension. |
| 4 | The priority of the extension. The extension with the lowest priority executes last. The default setting is 0. This setting is optional. |
| 5 | The start priority of the extension. The extension with the lowest priority starts last. The default setting is 1000. The lowest possible priority is 0. This setting is optional. |
| 6 | The author of the extension. This setting is optional. |
The start priority in the hivemq-extension.xml file is only used if it is not possible to determine the temporal resolution between two extension start events.
This usually happens at the start of HiveMQ if several extensions are already present in the extensions folder, or during a simultaneous hot reload of multiple extensions.
Otherwise, the first extension that HiveMQ detects loads first.
HiveMQ does not guarantee the order in which extensions stop.
|
Create an Extension with the HiveMQ Maven Archetype
There are many ways to create your first extension for HiveMQ. In this guide, we use a preconfigured Maven archetype to create the Java project that serves as the base of your HiveMQ extension.
| HiveMQ also offers a Gradle plugin for the development of HiveMQ extensions. For more information, see HiveMQ Extension Gradle Plugin. |
What is a Maven Archetype?
A Maven archetype is a project templating toolkit that provides a consistent way to generate templates for Maven projects. The HiveMQ Maven archetype creates a fully-functional HelloWorld extension that you can use as a basis for developing your own extensions. Templates are the simplest way to get started with extension development. To learn more about Maven and Maven archetypes, see the official Maven documentation and the Maven archetype guide.
All HiveMQ dependencies, including the hivemq-maven-archetype are available in Maven central.
The first step in this extension development process is to use the HiveMQ Maven Archetype to create the Java project that you need for your extension.
This guide outlines three commonly used ways to create a Java project with Maven for you to choose from:
Use your command line to create the Java project for your HiveMQ extension (with Maven):
-
Make sure Apache Maven is available. For more information, see Maven - Environment Setup tutorial.
-
Open a terminal and go to the file directory where you want to create the new project folder with the extension source files.
-
To generate the project with the HiveMQ Maven archetype, enter the following command:
mvn archetype:generate -DarchetypeGroupId=com.hivemq -DarchetypeArtifactId=hivemq-extension-archetype -DarchetypeVersion=4.6.3 -DhivemqExtensionSdkVersion=4.5.0The generation process automatically creates a folder with all the necessary files inside the directory where you executed the command.
-
When prompted, define the following Maven identifiers for your new project:
-
GroupId
-
ArtifactId
-
Version
-
Package
-
-
The Maven-archetype command creates a new folder that contains your fully-functional HiveMQ extension. The new folder has the same name as the
ArtifactIdthat you defined for the Maven-extension archetype of your project.
The Java project of the HiveMQ extension is a basic Maven project that includes thehivemq-extension-sdkas a dependency. Maven automatically downloads and adds the HiveMQ Extension SDK from Maven Central to your project.
Next Steps
To get all the details on the HiveMQ Extension SDK API, see our JavaDoc. For information on how to run and debug your new extension, see Develop Your HiveMQ Extension.
Use IntelliJ IDEA to create the Java project for your HiveMQ extension (with Maven):
-
Open IntelliJ and go to File | New Project.
-
In the New Project dialog, select Maven.
-
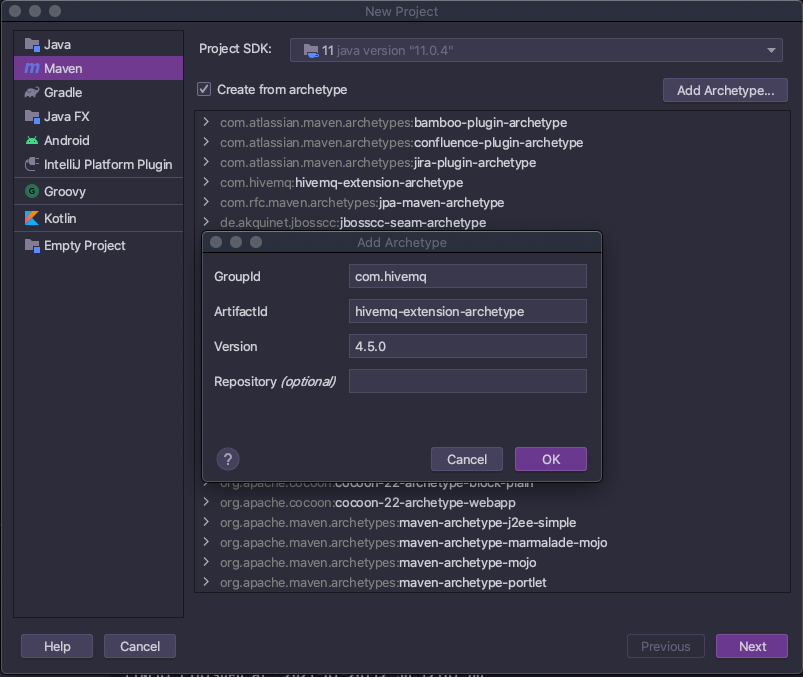
From the expanded options in the New Project dialog, check Create from archetype and select Add Archetype.
-
In the Add Archetype dialog, specify the following Maven archetype coordinates that are added to the pom.xml file of your extension project:
-
GroupId: com.hivemq
-
ArtifactId: hivemq-extension-archetype
-
Version: 4.6.3
-
-
Select OK to save the information and close the Add Archetype dialog.
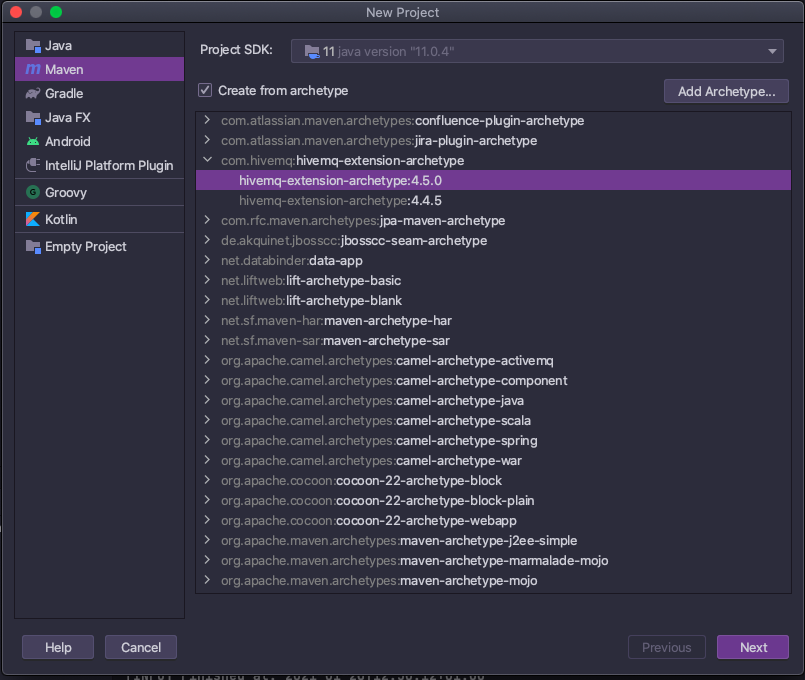
-
From the list of available archetypes in the New Project dialog, expand *com.hivemq:hivemq-extension-archetype*, select the newly added *hivemq-extension-archetype:4.6.3* archetype, then select Next.
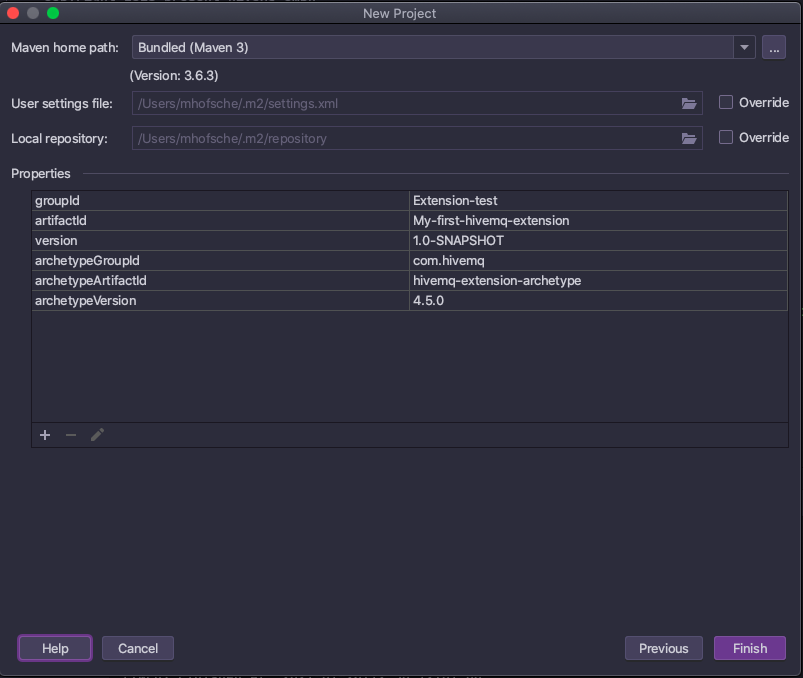
-
In the next New Project dialog, enter a Name and Location for your new project as well as the desired Artifact Coordinates, then select Next.

-
Review your project settings and select Finish.
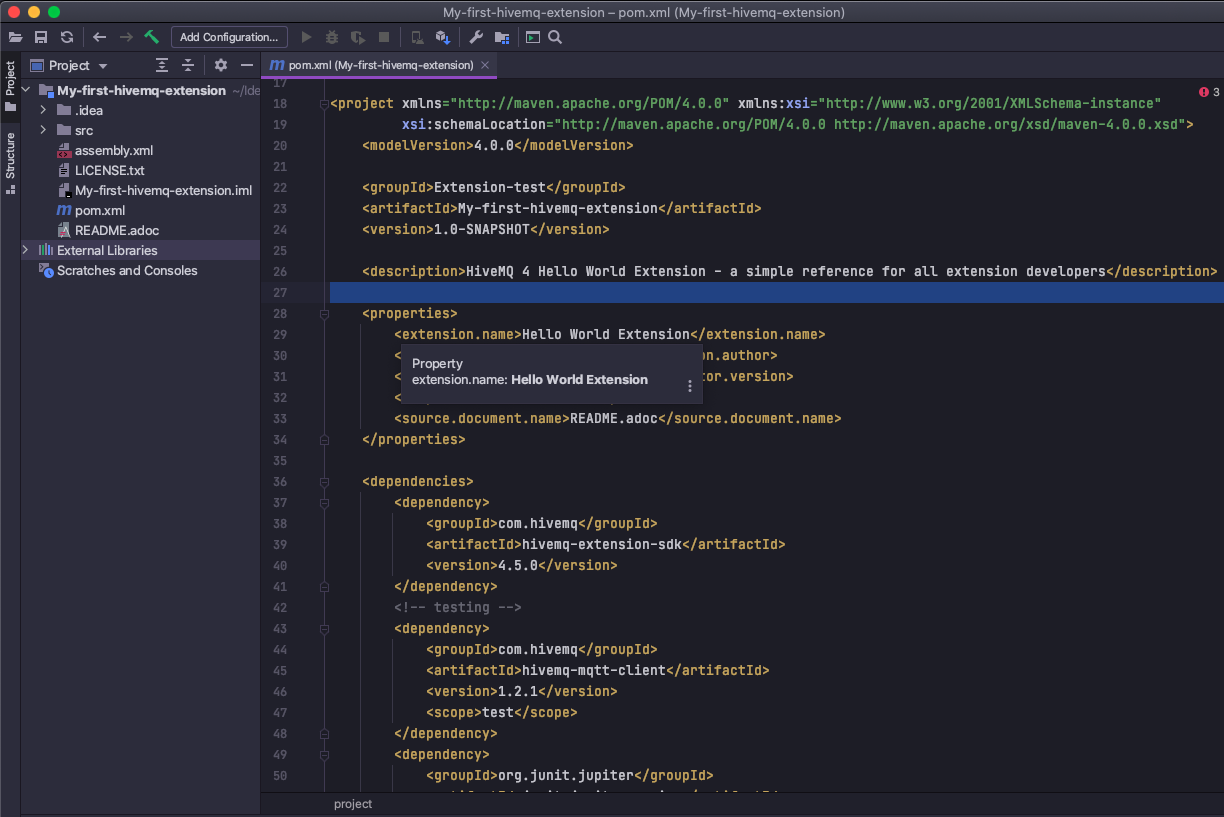
-
IntelliJ creates your project, resolves all Maven dependencies, and opens the
pom.xml(Maven Project Object Model) file of your newly created extension:
Next Steps
To get all the details on the HiveMQ Extension SDK API, see our JavaDoc. For information on how to run and debug your new extension, see Develop Your HiveMQ Extension.
Use Eclipse IDE to create the Java project for your HiveMQ extension (with Maven):
-
Make sure you have the Eclipse IDE for Java Developers, otherwise Maven is not included by default
-
Open Eclipse IDE for Java Developers and go to File | New | Project | Maven and select Maven Project, then Next >.
-
Set your Eclipse workspace location and select Next >.
-
In the New Maven Project dialog, select Add archetype….
-
In the Add Archetype dialog, enter the following details for your Maven Archetype and select OK.
-
Archetype Group Id: com.hivemq
-
Archetype Artifact Id: hivemq-extension-archetype
-
Archetype Version: 4.6.3
-
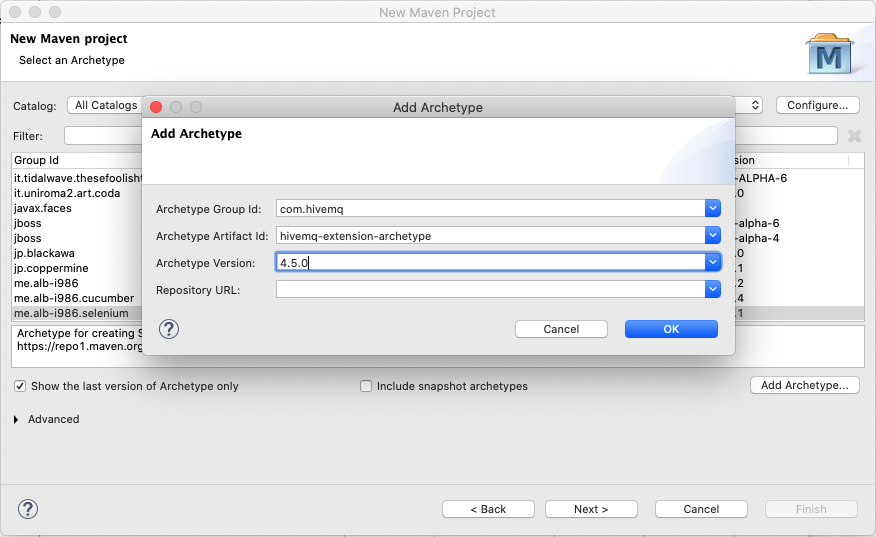
-
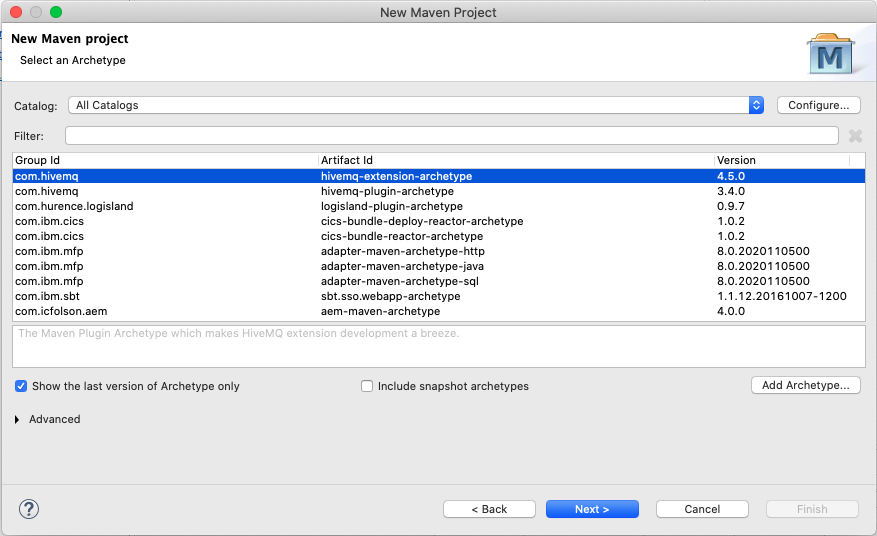
Verify that the newly added archetype is highlighted in the list of available archetypes and select Next >:
-
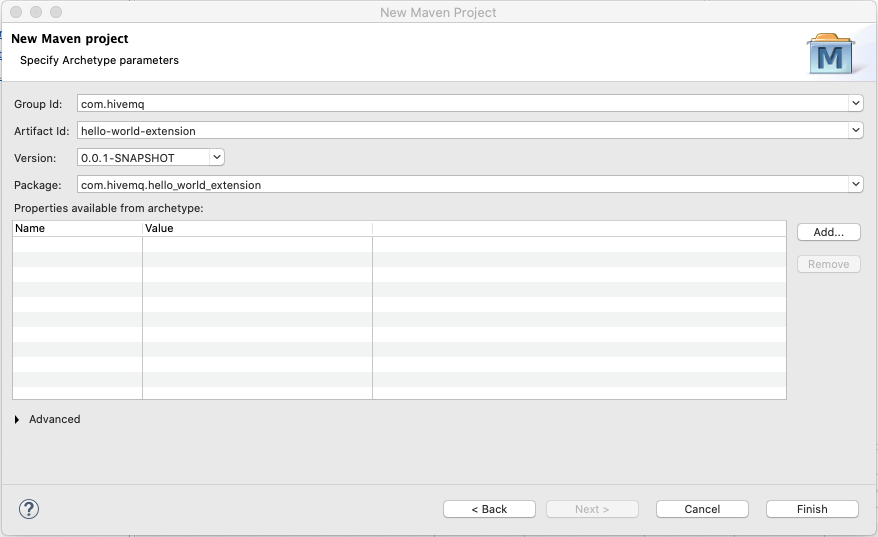
Specify the desired Group Id, Artifact Id, and Version parameters for your extension, then select Finish
-
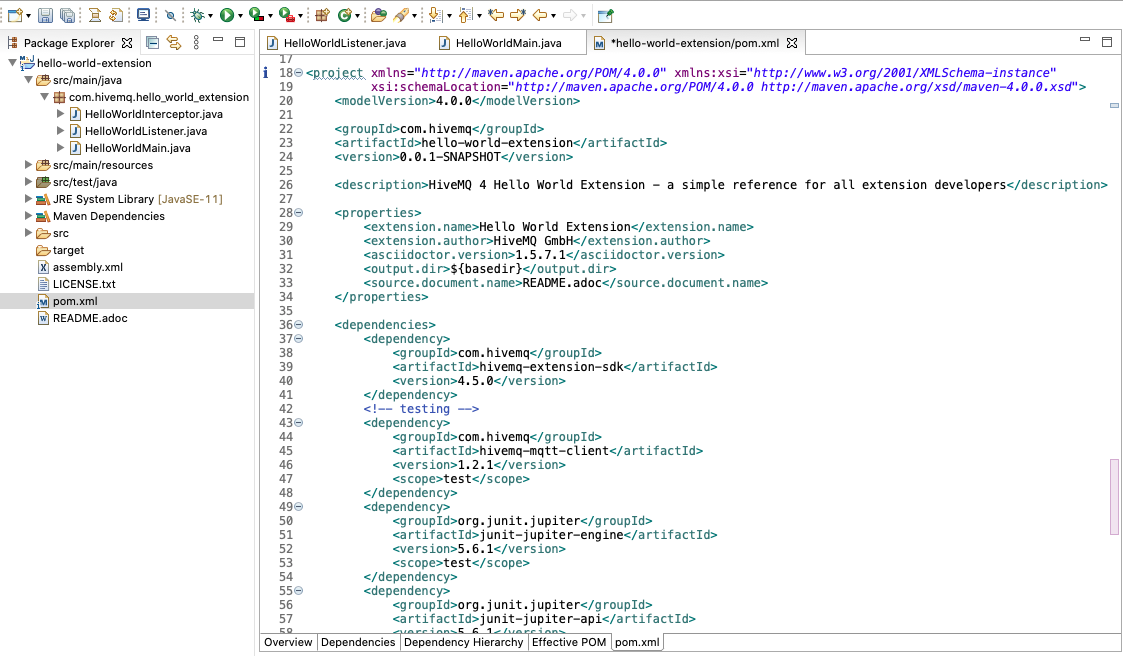
Eclipse creates your project and resolves all dependencies:
Next Steps
To get all the details on the HiveMQ Extension SDK API, see our JavaDoc. For information on how to run and debug your new extension, see Develop Your HiveMQ Extension.
Develop Your HiveMQ Extension
After you create your Hello World Extension Java project with the Maven HiveMQ Extension Archetype, you can use the project as a basis to implement custom logic for your individual use case.
To get an idea of all the services and events you can leverage in your HiveMQ extension, see Services, Registries, and Interceptors.
Java Project Structure
Now, lets take a look at the essential parts of the Java project structure:
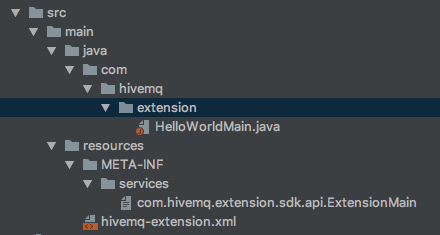
The HiveMQ Extension Maven Archetype creates a Hello World Java project that includes the minimum elements that a HiveMQ extension requires:
-
A Java class that implements
com.hivemq.extension.sdk.api.ExtensionMainis the starting point of every HiveMQ extension. -
A text file in the META-INF/services folder named com.hivemq.extension.sdk.api.ExtensionMain that tells HiveMQ where to find the main class of the extension.
-
An XML file in the resources folder named hivemq-extension.xml that contains the metadata of the extension.
| The HiveMQ Maven archetype automatically generates all of these files with the desired content. |
ExtensionMain
The starting point of every extension development is a class that implements the ExtensionMain class of the
HiveMQ Extension SDK.
The interface ExtensionMain consists of the methods extensionStart and extensionStop.
HiveMQ calls the extensionStart method when you start the extension.
This method is also the starting point for extension development, since this is also the point where an extension can register callbacks and implementations with HiveMQ.
The following example shows the minimal content of a main class for a HiveMQ extension:
public class HelloWorldMain implements ExtensionMain {

    @Override
    public void extensionStart(ExtensionStartInput input, ExtensionStartOutput output) {
        //Code to run when extension is started
    }

    @Override
    public void extensionStop(ExtensionStopInput input, ExtensionStopOutput output) {
        //Code to run when extension is stopped
    }
}
When you rename the main class (in our example, HelloWorldMain), you must change the reference to the class in the src/main/resources/META-INF/services/com.hivemq.extension.sdk.api.ExtensionMain file.
|
Next Steps
To deepen your understanding of HiveMQ extensions, see General Concepts and familiarize yourself with the HiveMQ Extension SDK API JavaDoc.
Build Your HiveMQ Extension
When you create your extension with the Maven HiveMQ Extension Archetype, you can build your HiveMQ extension with a single Maven goal:
-
Open a terminal window, go to the directory where your extension is located, and execute the following command:
mvn packageThis command creates an <artifactId>-<version>-distribution.zip archive in the target folder.
The zip archive contains your ready-to-deploy HiveMQ extension.
| If you used a different method to create your extension, follow the extended packaging phrase procedure to extend your Maven package. |
Deploy Your Extension
Once your extension is built and packaged, your fully-functional HiveMQ extension project is ready to be deployed to HiveMQ.
-
To deploy your HiveMQ extension to your HiveMQ instance, unzip the archive and move the extracted extension folder to the extensions folder of your HiveMQ instance:
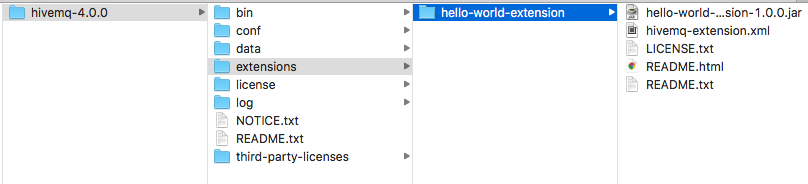 * HiveMQ automatically recognizes and starts your new extension.
2018-12-11 12:18:00,248 INFO  - Started Hello World Extension:1.0.0
2018-12-11 12:18:00,248 INFO - Extension "Hello World Extension" version 1.0.0 started successfully.| HiveMQ 4 and the HiveMQ Extension SDK support Extension Hot Reload. This functionality allows you to add and remove extensions to HiveMQ during runtime. |
Next Steps
To learn more about how your extension works, see Extension Lifecycle.
Test Your Extension
When you develop an extension, regular testing and debugging are fundamental parts of the process. Your testing identifies any bugs or errors in your extension.
When you develop a HiveMQ extension, regular testing is a fundamental part of the process. The HiveMQ Testcontainer gives you the tools you need to automatically deploy and run your extension on the fly inside a Docker container, while running a JUnit Test.
Next Steps
For step-by instructions on how to use the HiveMQ Testcontainer, see Test HiveMQ Extensions.
Debug Your HiveMQ Extension
Debugging your extension removes or corrects any bugs or errors that your testing uncovers. Debugging is crucial for the development of your custom HiveMQ extension because it shows you exactly how your extension behaves at runtime. This in-depth view provides unique insights that make it easier to quickly identify and eradicate the cause of any unwanted behavior.
A typical debugging procedure packages, extracts, and deploys the extension after every change. This process is not conducive to quickly switching between development and testing. Additionally, the extension can not be debugged without a running HiveMQ instance.
Debug with the HiveMQ Maven Plugin
To facilitate plugin development and provide a more convenient way to debug your extensions, HiveMQ created the HiveMQ Maven plugin.
Our Maven plugin gives you two key advantages:
-
Easily run your extensions on HiveMQ for testing purposes
-
Efficiently debug your extension
For step-by-step instructions on how to debug a custom HiveMQ extension, see Debug Your HiveMQ Extension with the HiveMQ Maven Plugin.
Debug with the HiveMQ Testcontainer
It is also possible to use the HiveMQ Test Container to simplify your extension debugging process.
For more information, see Debug with the HiveMQ Testcontainer.
| If you want to run your extension without debugging, you can set the debugMode to NONE. For more configuration options see, HiveMQ Maven Plugin User Guide. |
Next Steps
That brings us to the end of this quick start guide.
To learn more about the possibilities HiveMQ extensions offer and view code examples for several frequently implemented HiveMQ extension use cases, we highly recommend these Popular HiveMQ Extension Use Cases: