HiveMQ Data Hub Quick Start Guide
The HiveMQ Data Hub provides mechanisms to define how MQTT data is handled in your HiveMQ broker and to model how MQTT clients work with the broker.
This quick start guide shows you how to get started with HiveMQ Data Hub in two different ways:
|
For brevity, the quick start guides focus on the creation of JSON data schemas and data policies. |
Requirements
-
A running HiveMQ Professional or Enterprise version 4.20.0 or higher.
-
Protocol Buffer Compiler (protoc) if you want to add protobuf schemas (optional)
-
HiveMQ MQTT CLI to test the system (optional)
Installation
-
Download and install HiveMQ.
-
Place your valid HiveMQ Data Hub license file (.plic) in the
licensefolder of your HiveMQ installation.
(Skip this step if you are using the Data Hub in Free Mode or Trial Mode).
|
Your HiveMQ Platform bundle includes a free version of the HiveMQ Data Hub with basic functionality. Additionally, you can start a five-hour trial mode of the Data Hub to try out the full range of Data Hub capabilities. To learn more about the different ways you can explore the HiveMQ Data Hub, see HiveMQ Data Hub Licensing. |
Configuration
The HiveMQ Data Hub is enabled by default (<enabled>true</enabled>).
config.xml file<hivemq>
<data-hub>
<data-validation>
<enabled>true</enabled>
</data-validation>
<behavior-validation>
<enabled>true</enabled>
</behavior-validation>
</data-hub>
</hivemq>
To disable Data Hub, set the enabled tags for data validation and behavior validation in the data-hub section of your HiveMQ config.xml file to false.
|
Data Hub Quick Start with the HiveMQ Control Center
The easiest way to get started with the HiveMQ Data Hub is with your HiveMQ Control Center.
This guide gives you step-by-step instructions to do the following with the HiveMQ Control Center:
-
Add a schema to define the expected structure and format of incoming MQTT message payload data.
-
Add a data policy to tell your HiveMQ broker how you want your incoming MQTT messages to be handled.
-
Test your setup with valid and invalid incoming MQTT message payload data.
Get Started on the HiveMQ Control Center
-
Use your browser to navigate to the HiveMQ Control Center.
For more information, see HiveMQ Control Center.
Add a Schema
-
In the HiveMQ Control Center main navigation, expand the Data Hub menu and select Schemas.
The Schemas overview for your HiveMQ deployment opens: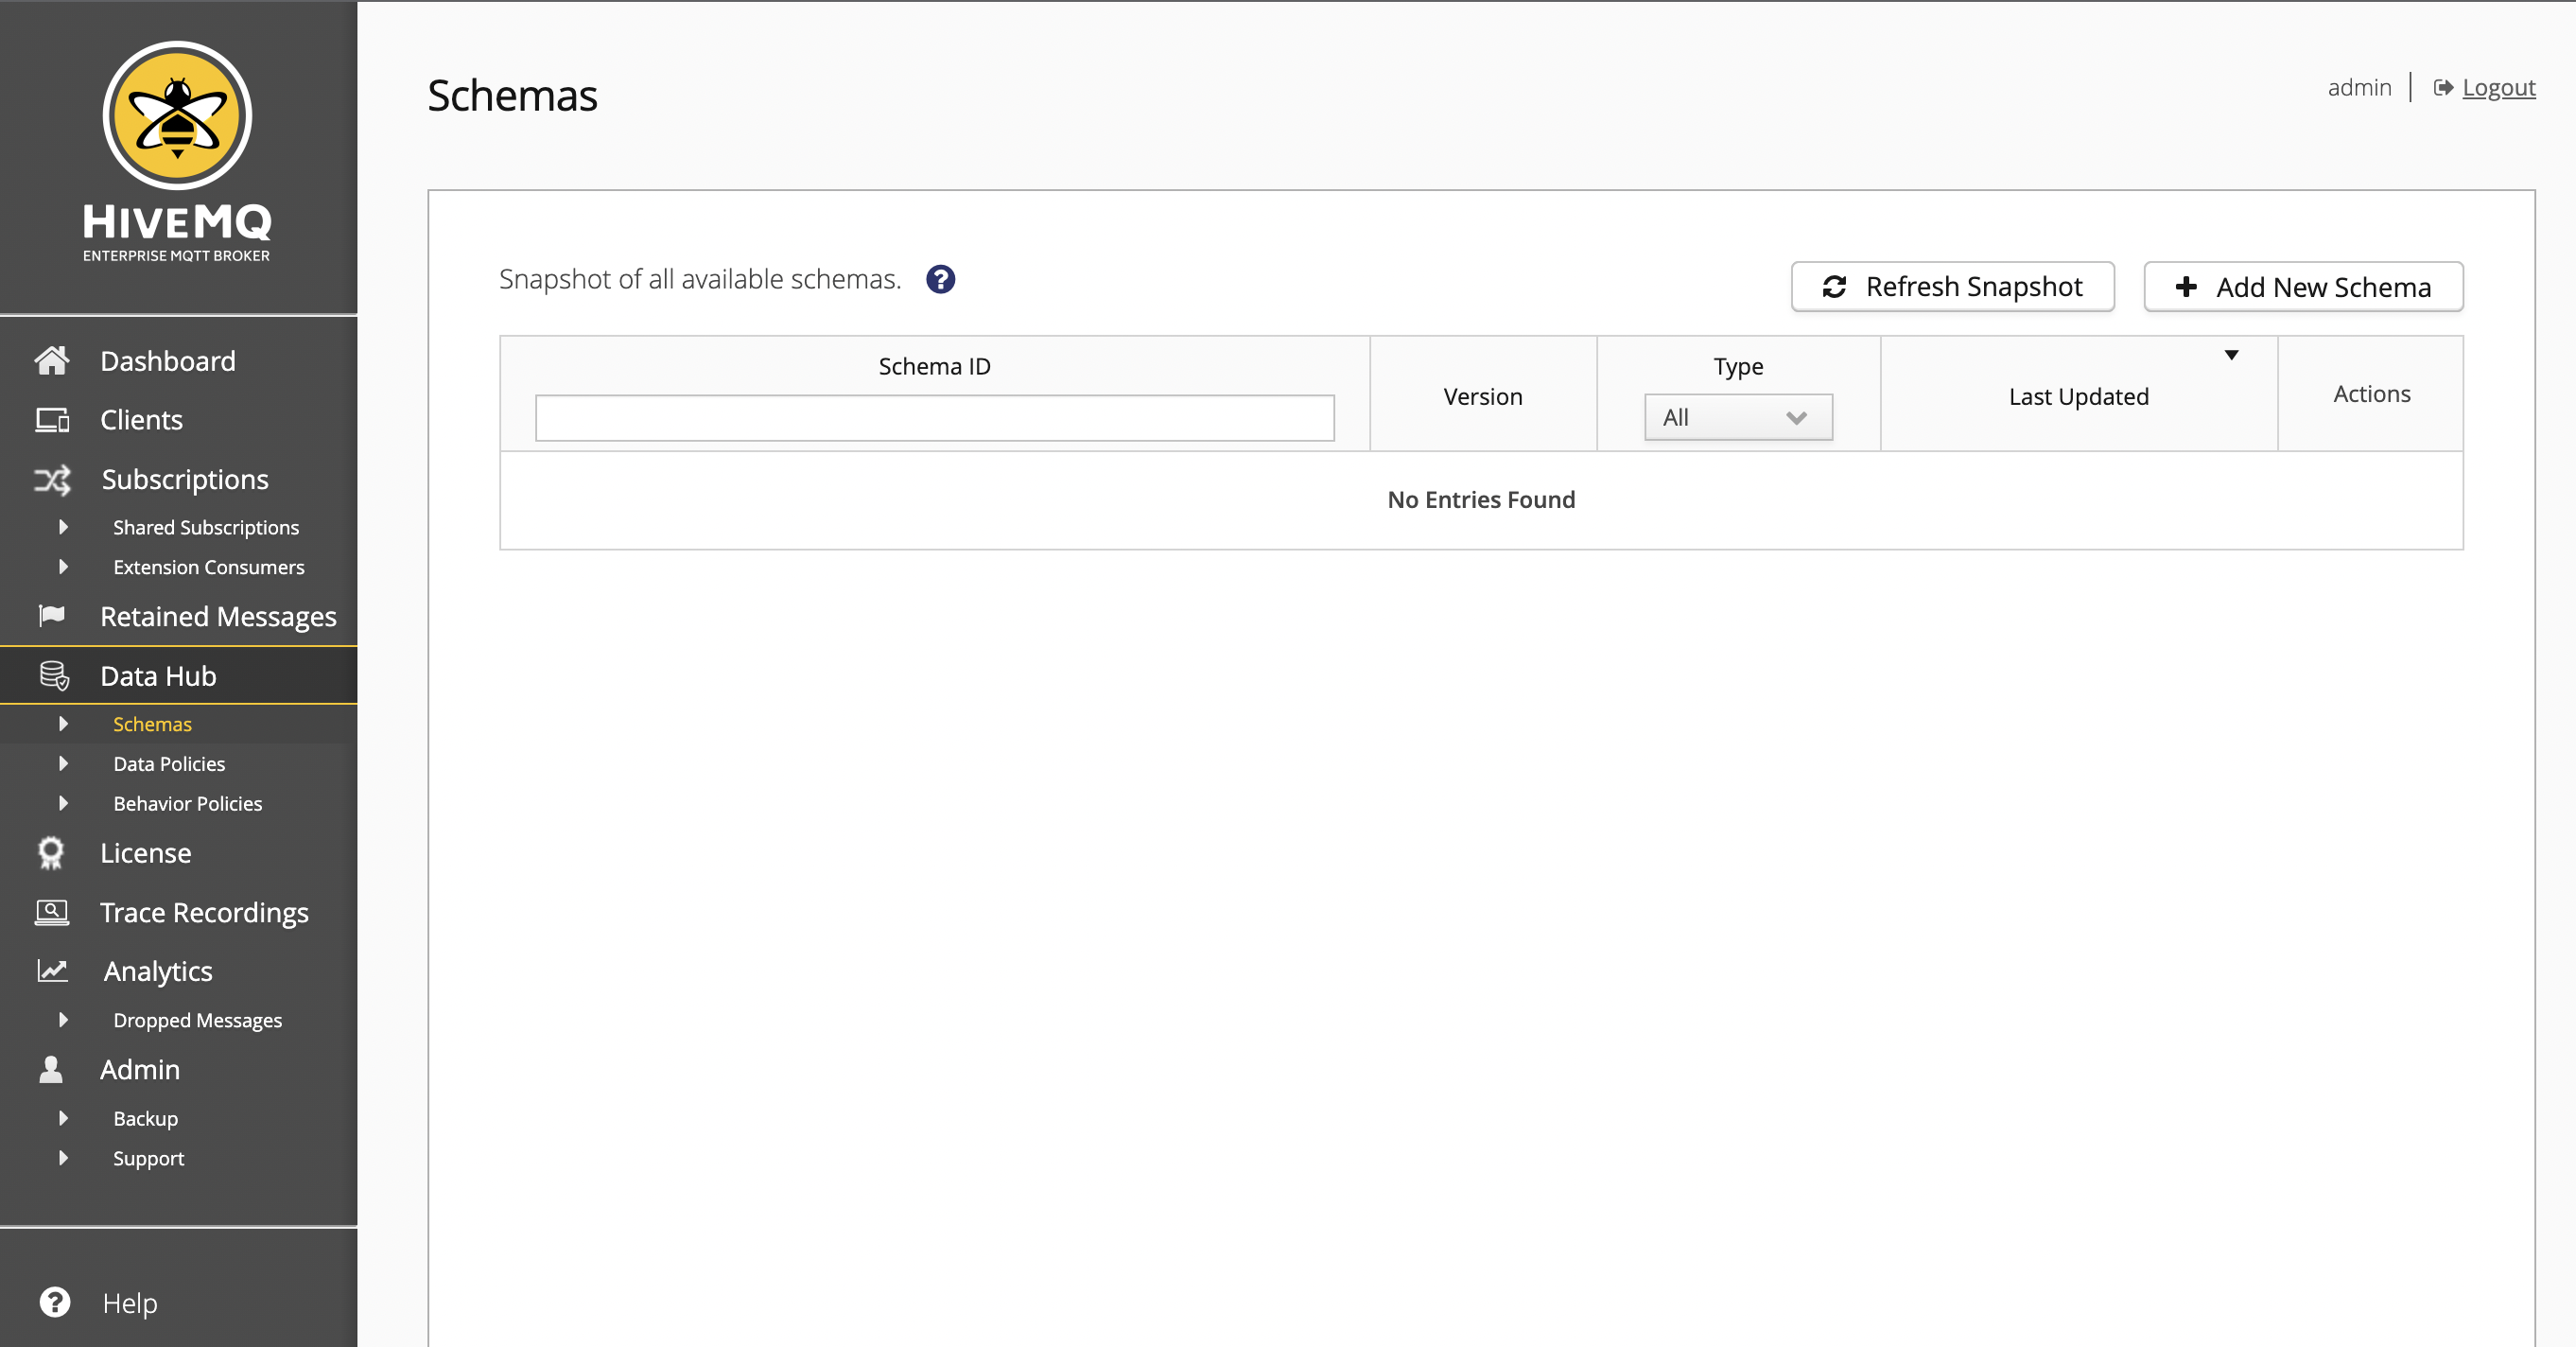
-
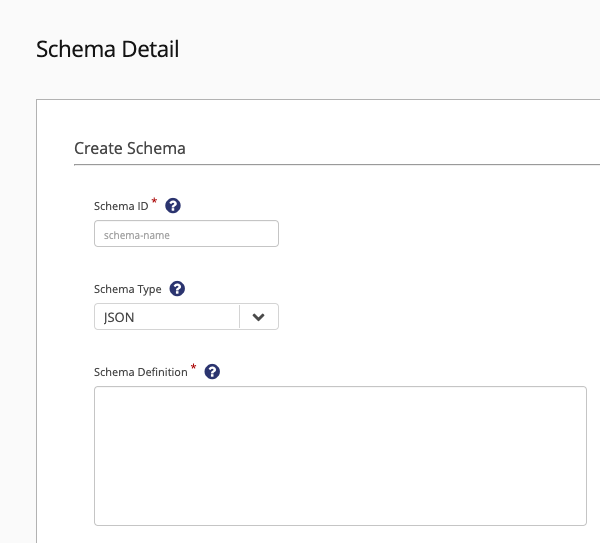
On the Schemas overview, select Add New Schema. A Schema Detail page opens:
-
When you create a schema, you need to specify a unique schema ID, the type of schema you want to create, and a description of the schema:
-
Enter an identifier for your schema in the Schema ID field. The schema ID is used to reference the schema in a policy and must be unique in the HiveMQ broker.
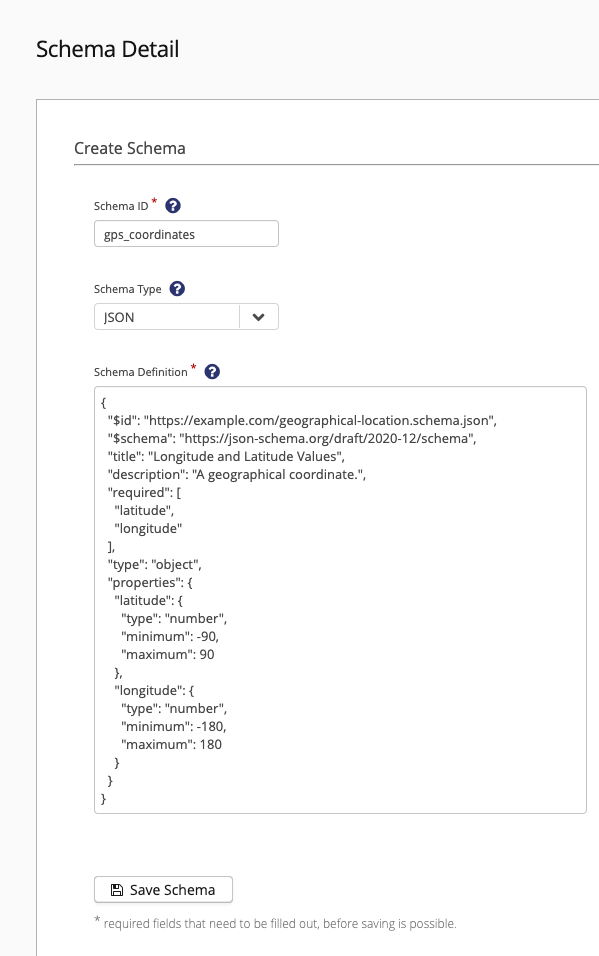
Each schema ID must begin with a letter and contain 1 to 1024 lowercase letters, uppercase letters, numbers, periods (.), hyphens (-), or underscores (_). In this guide, we use the schema IDgps_coordinates. -
Select
JSONin the Schema type field.
Possible values areJSONorPROTOBUF.
In this guide, we create a JSON Schema. -
Copy and paste the following example schema definition into the Schema Definition field. The schema definition describes the JSON Schema and is used to validate and deserialize MQTT message payloads.
Example schema definition{ "$id": "https://example.com/geographical-location.schema.json", "$schema": "https://json-schema.org/draft/2020-12/schema", "title": "Longitude and Latitude Values", "description": "A geographical coordinate.", "required": [ "latitude", "longitude" ], "type": "object", "properties": { "latitude": { "type": "number", "minimum": -90, "maximum": 90 }, "longitude": { "type": "number", "minimum": -180, "maximum": 180 } } } -
To save the
gps_coordinatesJSON Schema, select Save Schema.
Add a Data Policy
Next, create a data policy that outlines how you want the HiveMQ broker to handle incoming MQTT message packets.
-
In the HiveMQ Control Center main navigation, expand the Data Hub menu and select Data Policies.
The Data Policies overview for your HiveMQ deployment opens: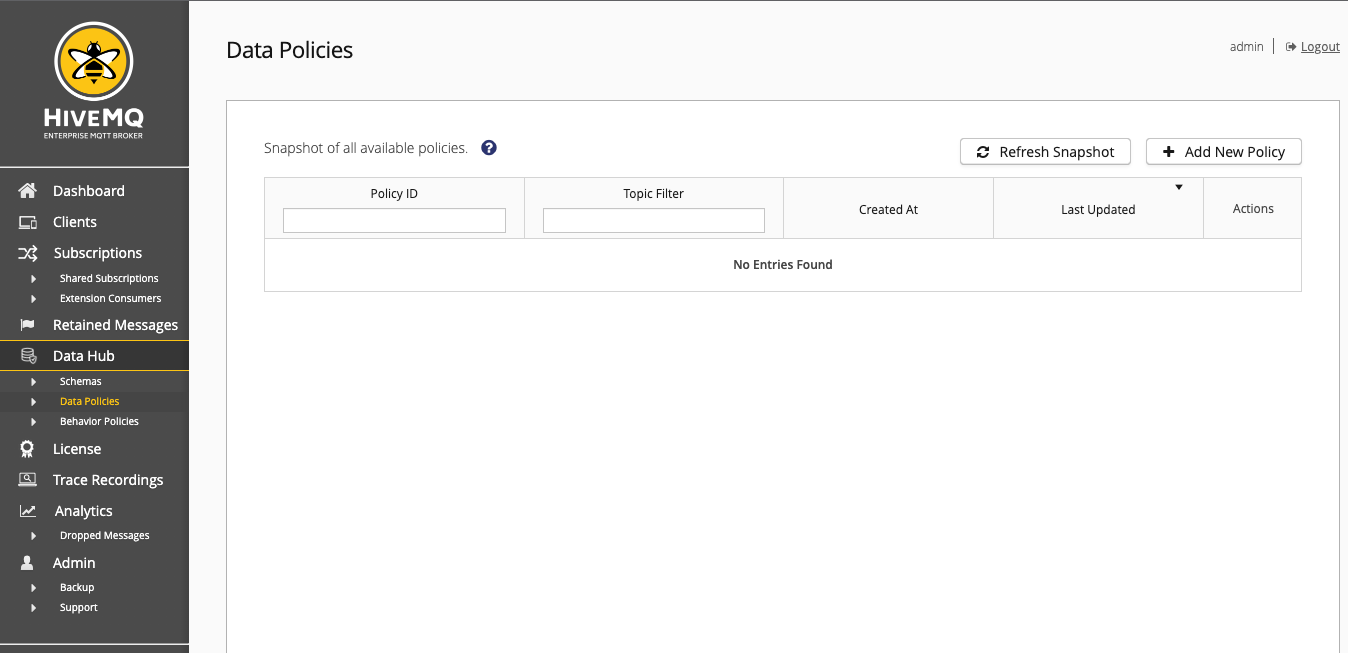
-
On the Data Policies overview, select Add New Policy. A Data Policy Detail page opens:
-
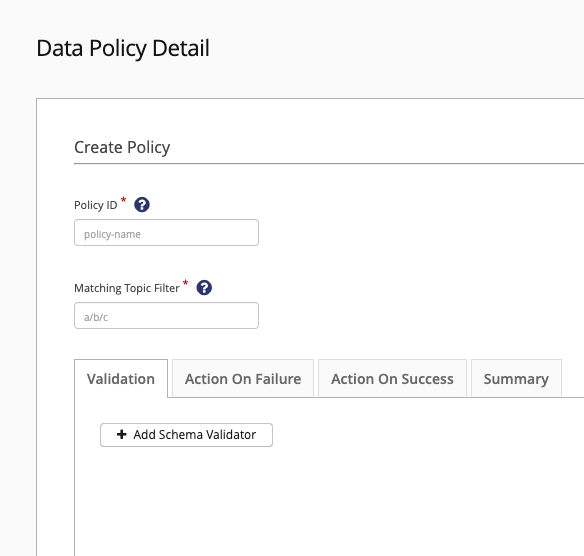
When you create a data policy, the first step is to define a unique policy ID, specify a matching topic filter that determines which MQTT messages the policy validates, and add the validation method you want the policy to use:
-
Enter an identifier for your policy in the Policy ID field. The Schema ID is used to reference the schema in a policy and must be unique in the HiveMQ broker.
Each schema ID must begin with a letter and contain 1 to 1024 lowercase letters, uppercase letters, numbers, periods (.), hyphens (-), or underscores (_). In this guide, we use the schema IDpolicy-coordinates. -
Specify an MQTT topic filter in the Matching Topic Filter field to determine which MQTT message payloads the policy validates. The filter can be any valid MQTT topic filter, including wildcards. Each topic filter can only be used in one policy per HiveMQ cluster.
In this guide, we use the Matching Topic Filtercoordinates/+. -
To select how you want the data policy to validate MQTT topic payloads, select Add Schema Validator on the Validation tab of the Data Policy Detail. If no validator is specified, no validation takes place and every message payload is evaluated as a success. One policy can contain multiple validators.
-
In this guide, on the Validations tab, select Add Schema in the Schemas area.
-
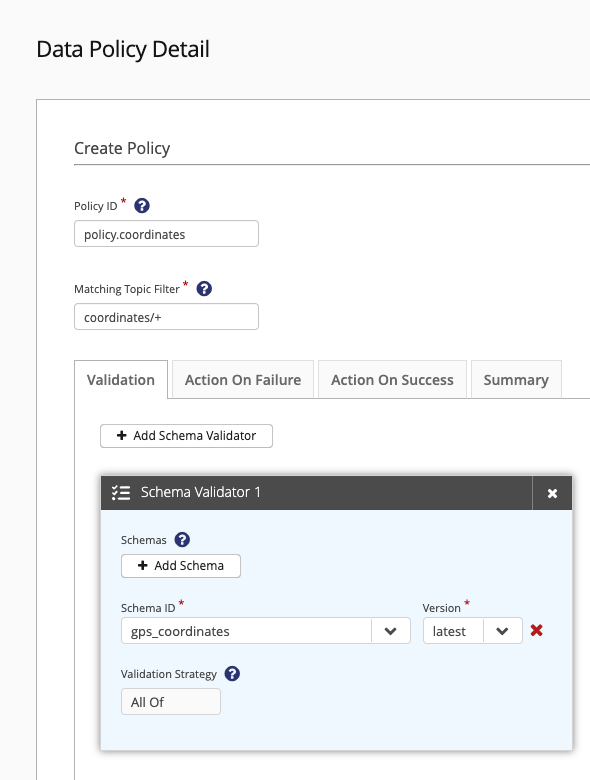
To select the schema that we created earlier in this guide, select
gps_coordinatesfrom the Schema ID menu.
Data Hub also supports the use of schema versions. For this example, selectlatestfrom the Version menu. -
It is possible to set multiple schemas for a single validator. The Validation Strategy determines how successful validation of a message is calculated. In this guide, we only set one schema and use the All Of strategy.
-
-
The result of your schema-based validation can be
successorfailure.
Based on the validation outcome, you can define optionalonFailureandonSuccessactions that take place when a validation finishes.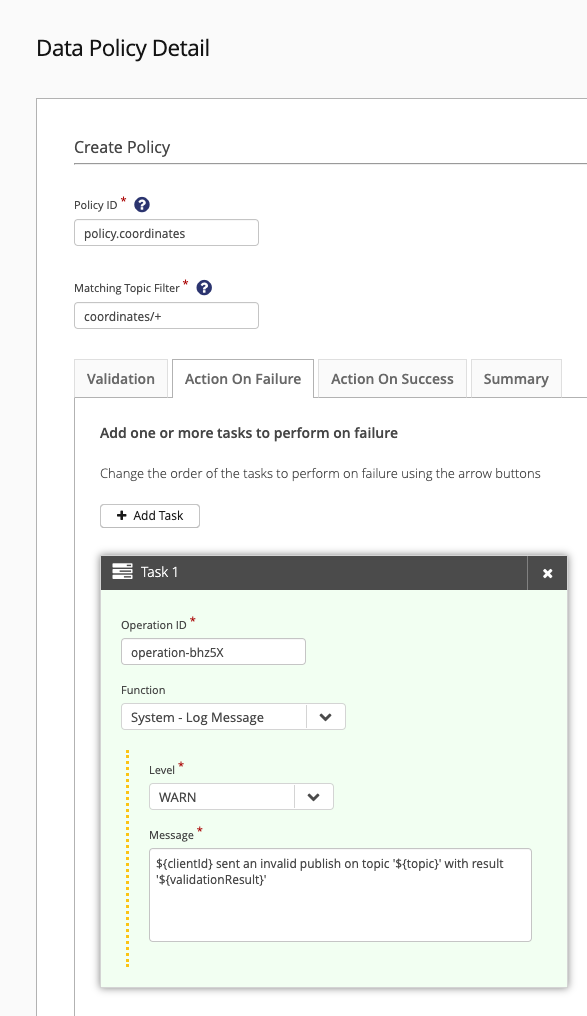
-
On the Action On Failure tab of the Data Policy Detail, select Add Task to define one or more tasks to take place if the outcome of a validation in this policy is
failure. Data Hub executes the tasks of an action pipeline in your defined order. -
From the Function menu, select an operation that occurs when a validation fails.
In this guide, we use System - Log Message to provide additional information.-
Use the Level menu to set the log level of the system message.
Possible log levels areTRACE,DEBUG,INFO,WARN, andERROR. In this guide, we set theWARNlevel. -
In the Message field, cut and paste the following variable to define the content of the log message:
${clientId} sent an invalid publish on topic '${topic}' with result '${validationResult}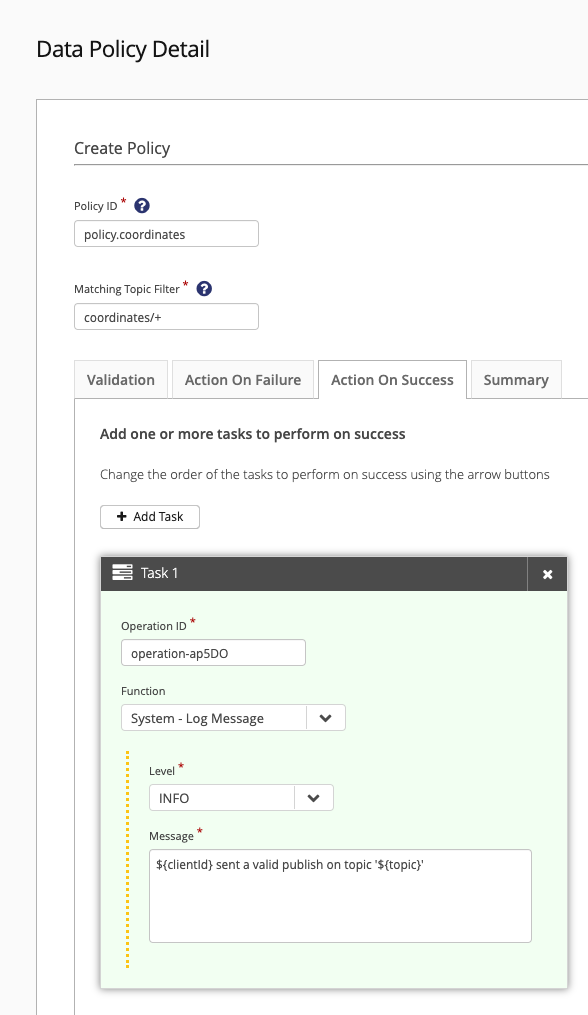
-
-
On the Action On Success tab of the Data Policy Detail, select Add Task to define one or more tasks to take place if the outcome of a validation in this policy is
success. Data Hub executes the tasks of an action pipeline in your defined order. -
From the Function menu, select an operation that occurs when a validation succeeds.
In this guide, we use System - Log Message to provide additional information.-
Use the Level menu to set the log level of the system message. In this guide, we set the
INFOlevel. -
In the Message field, cut and paste the following variable to define the content of the log message:
${clientId} sent a valid publish on topic '${topic}'
-
-
To complete your Data Policy, switch to the Summary tab of the Data Policy Detail and review the content of your policy draft:
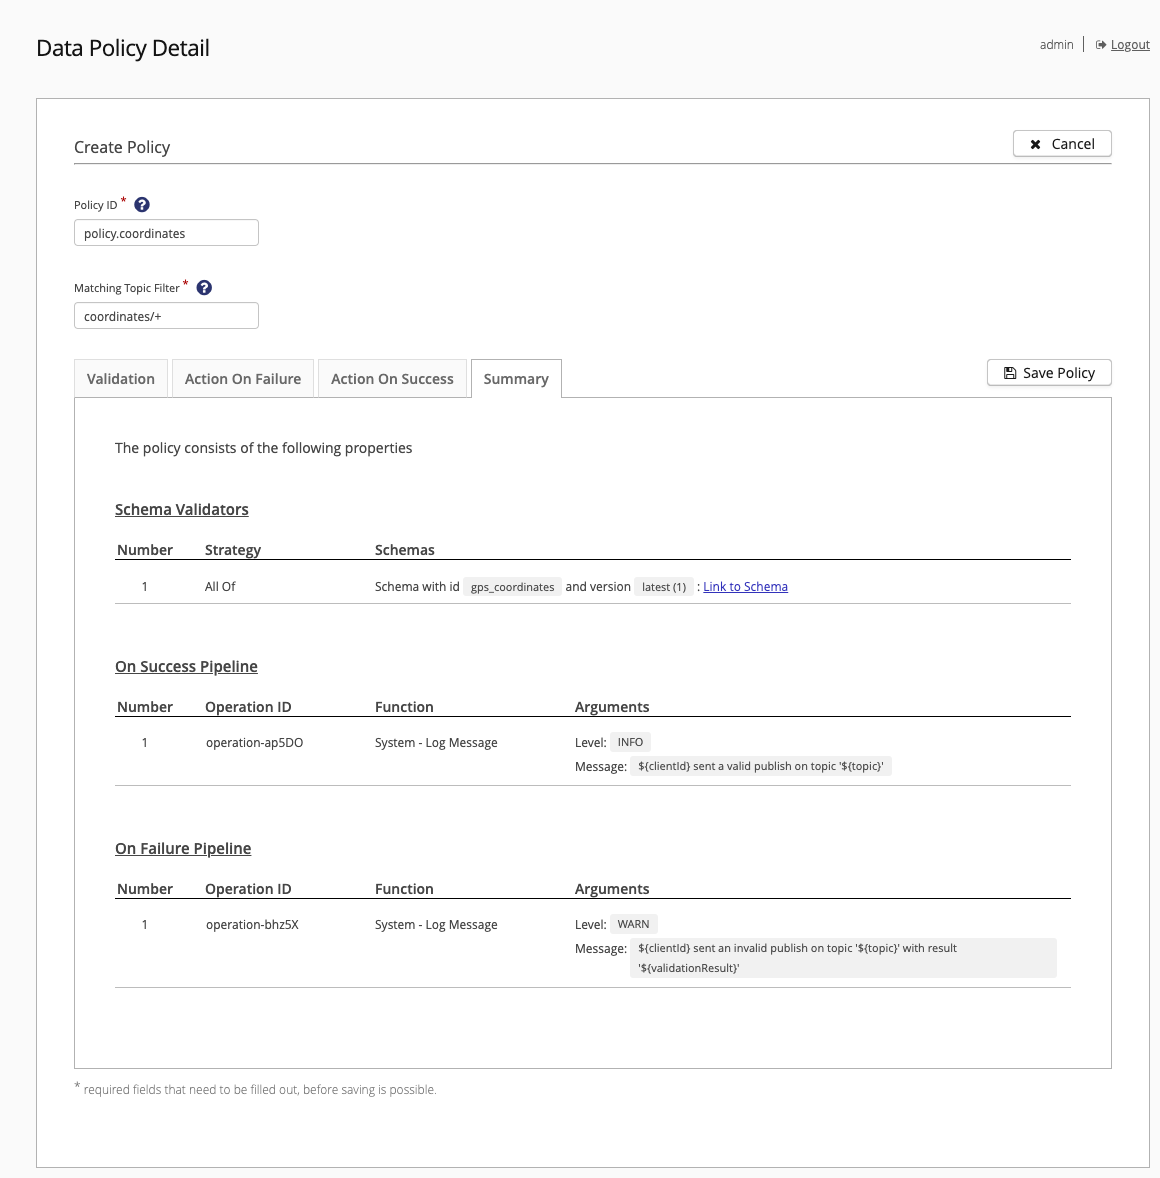
-
To save your data policy, select Save Policy.
Edit or Delete a Data Policy
-
To edit or delete a Data Policy, return to the Policy Detail of the policy. To edit the policy, select the edit icon.
To delete the policy, select Delete.
For more information on all the Data Hub options the HiveMQ Control Center offers, see HiveMQ Control Center.
Test Your Data Policy
The Data Hub dashboard on the HiveMQ Control Center gives you a clear visual overview of the health of your data pipelines.

-
To test your Data Hub setup, follow the procedure in the Test section to send messages that generate
successandfailureoutcomes.
Data Hub Quick Start with the HiveMQ REST API
You can also use the HiveMQ REST API to create and manage the HiveMQ Data Hub.
Before you get started, make sure that the HiveMQ REST API is enabled in the config.xml file of your HiveMQ installation.
To enable the HiveMQ REST API, set the <enabled> option in the <rest-api> section of the HiveMQ configuration to true.
<hivemq>
    ...
    <!-- Enable the REST-API -->
    <rest-api>
        <enabled>true</enabled>
    </rest-api>
    ...
</hivemq>
This guide gives you step-by-step instructions to do the following with the HiveMQ REST API:
-
Add a schema to define the expected structure and format of incoming MQTT message payload data.
-
Add a data policy to tell your HiveMQ broker how you want your incoming MQTT messages to be handled.
-
Test your setup with valid and invalid incoming MQTT message payload data.
For more information on all the Data Hub options the HiveMQ REST API offers, see HiveMQ Data Management - Open API Specification.
Add Schemas
The HiveMQ Data Hub supports JSON Schemas and Protobuf.
Add a JSON Schema
-
Create a JSON Schema called
coordinates.json:coordinates.json{ "$id": "https://example.com/geographical-location.schema.json", "$schema": "https://json-schema.org/draft/2020-12/schema", "title": "Longitude and Latitude Values", "description": "A geographical coordinate.", "required": [ "latitude", "longitude" ], "type": "object", "properties": { "latitude": { "type": "number", "minimum": -90, "maximum": 90 }, "longitude": { "type": "number", "minimum": -180, "maximum": 180 } } } -
Encode the JSON Schema file in base64 (encoding is required):
cat coordinates.json | base64 > coordinates_base64.txtResulting coordinates_base64.txtewogICIkaWQiOiAiaHR0cHM6Ly9leGFtcGxlLmNvbS9nZW9ncmFwaGljYWwtbG9jYXRpb24uc2NoZW1hLmpzb24iLAogICIkc2NoZW1hIjogImh0dHBzOi8vanNvbi1zY2hlbWEub3JnL2RyYWZ0LzIwMjAtMTIvc2NoZW1hIiwKICAidGl0bGUiOiAiTG9uZ2l0dWRlIGFuZCBMYXRpdHVkZSBWYWx1ZXMiLAogICJkZXNjcmlwdGlvbiI6ICJBIGdlb2dyYXBoaWNhbCBjb29yZGluYXRlLiIsCiAgInJlcXVpcmVkIjogWwogICAgImxhdGl0dWRlIiwKICAgICJsb25naXR1ZGUiCiAgXSwKICAidHlwZSI6ICJvYmplY3QiLAogICJwcm9wZXJ0aWVzIjogewogICAgImxhdGl0dWRlIjogewogICAgICAidHlwZSI6ICJudW1iZXIiLAogICAgICAibWluaW11bSI6IC05MCwKICAgICAgIm1heGltdW0iOiA5MAogICAgfSwKICAgICJsb25naXR1ZGUiOiB7CiAgICAgICJ0eXBlIjogIm51bWJlciIsCiAgICAgICJtaW5pbXVtIjogLTE4MCwKICAgICAgIm1heGltdW0iOiAxODAKICAgIH0KICB9Cn0K -
Define the body of the create schema POST request that you need to upload the schema to your HiveMQ broker in a file called
coordinates-body.json:Body for the create schema POST request{ "id": "gps_coordinates", "type": "JSON", "schemaDefinition": "ewogICIkaWQiOiAiaHR0cHM6Ly9leGFtcGxlLmNvbS9nZW9ncmFwaGljYWwtbG9jYXRpb24uc2NoZW1hLmpzb24iLAogICIkc2NoZW1hIjogImh0dHBzOi8vanNvbi1zY2hlbWEub3JnL2RyYWZ0LzIwMjAtMTIvc2NoZW1hIiwKICAidGl0bGUiOiAiTG9uZ2l0dWRlIGFuZCBMYXRpdHVkZSBWYWx1ZXMiLAogICJkZXNjcmlwdGlvbiI6ICJBIGdlb2dyYXBoaWNhbCBjb29yZGluYXRlLiIsCiAgInJlcXVpcmVkIjogWwogICAgImxhdGl0dWRlIiwKICAgICJsb25naXR1ZGUiCiAgXSwKICAidHlwZSI6ICJvYmplY3QiLAogICJwcm9wZXJ0aWVzIjogewogICAgImxhdGl0dWRlIjogewogICAgICAidHlwZSI6ICJudW1iZXIiLAogICAgICAibWluaW11bSI6IC05MCwKICAgICAgIm1heGltdW0iOiA5MAogICAgfSwKICAgICJsb25naXR1ZGUiOiB7CiAgICAgICJ0eXBlIjogIm51bWJlciIsCiAgICAgICJtaW5pbXVtIjogLTE4MCwKICAgICAgIm1heGltdW0iOiAxODAKICAgIH0KICB9Cn0K" }-
The
idcan be any identifier, you will need this as the schema’s reference in a policy. -
The
typemust bePROTOBUForJSON. -
The
schemaDefinitionis the content ofcoordinates_base64.txt.
-
-
To upload the
coordinates-body.jsonschema to your broker, run the following command:curl -H "Content-Type: application/json" -d "@coordinates-body.json" -X POST http://localhost:8888/api/v1/data-validation/schemas
This example assumes that your HIVEMQ REST API runs at http://localhost:8888.
|
Add a Protobuf Schema
-
Create a Protobuf schema called
coordinates.proto:coordinates.protosyntax = "proto3"; message GpsCoordinates { int32 longitude = 1; int32 latitude = 2; } -
Compile
coordinates.prototo the descriptor setcoordinates.desc:protoc --descriptor_set_out=coordinates.desc coordinates.proto -
Encode the descriptor file in base64 (encoding is required):
cat coordinates.desc | base64 > coordinates_base64.txtResulting coordinates_base64.txtCmcKEWNvb3JkaW5hdGVzLnByb3RvIkoKDkdwc0Nvb3JkaW5hdGVzEhwKCWxvbmdpdHVkZRgBIAEoBVIJbG9uZ2l0dWRlEhoKCGxhdGl0dWRlGAIgASgFUghsYXRpdHVkZWIGcHJvdG8z -
Craft the body of the create schema POST request to upload the schema called
coordinates-body.json:Body for the post request{ "id": "gps_coordinates", "type": "PROTOBUF", "schemaDefinition": "CmcKEWNvb3JkaW5hdGVzLnByb3RvIkoKDkdwc0Nvb3JkaW5hdGVzEhwKCWxvbmdpdHVkZRgBIAEoBVIJbG9uZ2l0dWRlEhoKCGxhdGl0dWRlGAIgASgFUghsYXRpdHVkZWIGcHJvdG8z", "arguments": { "messageType": "GpsCoordinates" } }-
The
idcan be any identifier, you will need this as the schema’s reference in a policy. -
The
typemust bePROTOBUForJSON. -
The
schemaDefinitionis the content ofcoordinates_base64.txt. -
The
messageTypeargument must be the name of the protobuf message from Step 1.
-
-
Upload it via
curl -H "Content-Type: application/json" -d "@coordinates-body.json" -X POST http://localhost:8888/api/v1/data-validation/schemas
Add a Data Policy
The policies you create tell your HiveMQ broker how you want your incoming MQTT messages to be handled.
HiveMQ Data Hub supports two types of policies. In this guide you create a data policy.
-
Data Policies
-
Behavior Policies
|
When you use the Data Hub in free mode, you can create one data policy or one behavior policy and use basic functionality. To create additional policies and explore all the capabilities of the HiveMQ Data Hub, activate your 5-hour full trial or contact our sales team for licensing information. |
-
Create a data policy in the file
coordinates-policy.json{ "id": "com.hivemq.policy.coordinates", "matching": { "topicFilter": "coordinates/+" }, "validation": { "validators": [ { "type": "schema", "arguments": { "strategy": "ALL_OF", "schemas": [ { "schemaId": "gps_coordinates", "version": "latest" } ] } } ] }, "onSuccess": { "pipeline": [ { "id": "logSuccess", "functionId": "System.log", "arguments": { "level": "INFO", "message": "${clientId} sent a valid publish on topic '${topic}' with result '${validationResult}'" } } ] }, "onFailure": { "pipeline": [ { "id": "logFailure", "functionId": "System.log", "arguments": { "level": "WARN", "message": "${clientId} sent an invalid publish on topic '${topic}' with result '${validationResult}'" } } ] } } -
Upload the policy to your HiveMQ broker with the following command (you must upload the referenced schema before you upload the policy):
curl -H "Content-Type: application/json" -d "@coordinates-policy.json" -X POST http://localhost:8888/api/v1/data-hub/data-validation/policiesThe policy is now applied and all incoming MQTT messages are subject to your specified data validation requirements.
Send an MQTT message with a valid payload
mqtt pub -h localhost -p 1883 -t coordinates/test -m "{\"longitude\":12, \"latitude\":42 }"10:27:33.449 INFO - hmq_GAht0_1_08087d5b1233e0bae4b6b10bfda40cc7 sent a valid publish on topic 'coordinates/test' with result 'ValidationResults:[{schemaId=gps_coordinates, success=true}]'Send an MQTT message with an invalid payload
mqtt pub -h localhost -p 1883 -t coordinates/test -m "{\"longitude\":12, \"latitude\":1337 }"10:32:06.237 WARN - hmq_skuhj_1_04c848009887ef38f86c729269faae16 sent an invalid publish on topic 'coordinates/test' with result 'ValidationResults:[{schemaId=gps_coordinates, success=false, errors=[$.latitude: must have a maximum value of 90]}]'Learn More
Once you set up your first schemas and policies, you are ready to dive deeper into all the capabilities the HiveMQ Data Hub offers. To learn more, browse our full user documentation on Policies, Schemas, and Behavior Models or explore a collection of practical use cases in our HiveMQ Policy Cookbooks.