HiveMQ Cloud Quick Start Guide
This guide shows you how to do the following in a few easy steps:
Try Out HiveMQ Cloud MQTT Broker for free
You can use the Serverless FREE HiveMQ Cloud plan at absolutely no cost. Our Serverless FREE plan is the perfect way to learn and experiment with MQTT and HiveMQ Cloud. Here are the details:
-
Access a basic MQTT broker features.
-
Shared MQTT platform.
-
Connect 100 MQTT devices at no cost to you.
-
No credit card required. Cancel anytime.
-
Begin immediately with our easy-to-follow quick-start guide.
| When you are ready to try out testing and small-scale production, create a new cluster and select the HiveMQ Starter plan 15-day free trial. If you would like to learn more about everything our HiveMQ Cloud Professional and Enterprise plans offer, contact us. We are happy to walk you through all the options. |
Sign Up and Log In on the HiveMQ Cloud Portal
To get started with HiveMQ Cloud, navigate to console.hivemq.cloud.
-
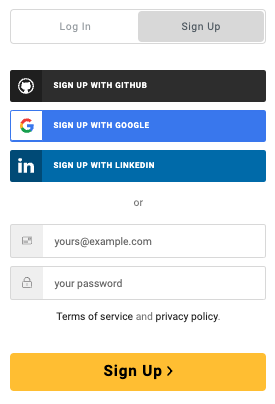
On the HiveMQ Cloud Portal dialog, switch to the Sign Up tab and sign up with method of your choice.
For your convenience, you can use your GitHub, Google, or LinkedIn account, or your email address to sign up and log in. -
Once you successfully sign up, switch back to the Log In tab and log in to your HiveMQ Cloud account with your selected method.
Start Your Free HiveMQ Cloud Experience
After you sign up and log in, a page to select the type of HiveMQ Cloud package you want to use opens. This quick start guide uses the Serverless FREE HiveMQ Cloud plan.
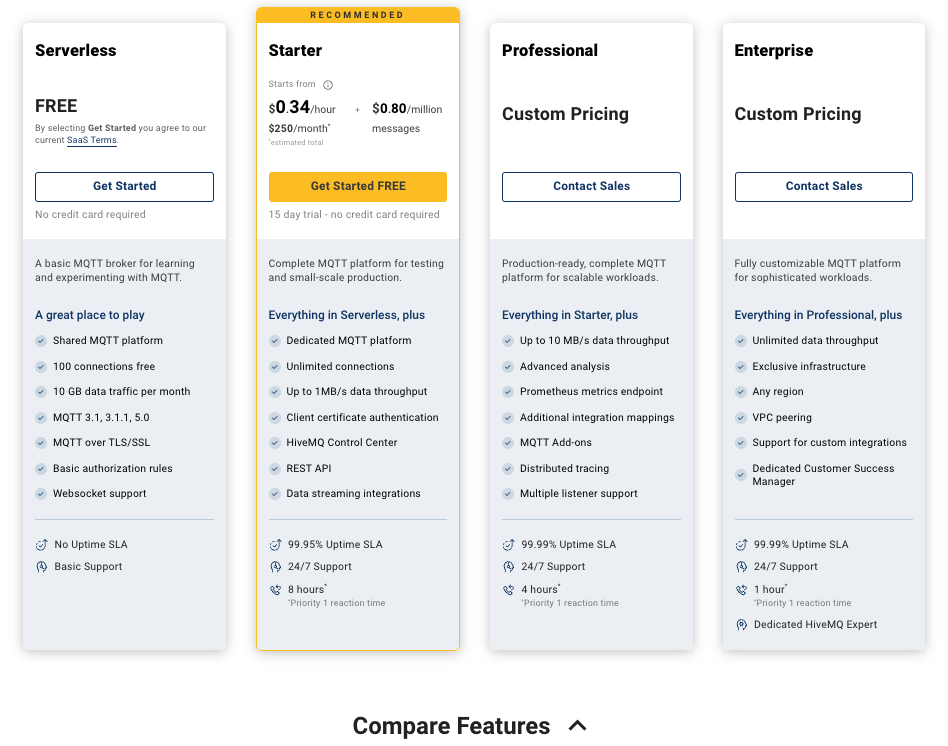
| To open an overview of the features each HiveMQ Cloud plan offers, expand the Compare Features option on the Create Cluster page. |
-
To begin your setup of a free HiveMQ Cloud cluster, select Get Started on the HiveMQ Cloud Serverless card.
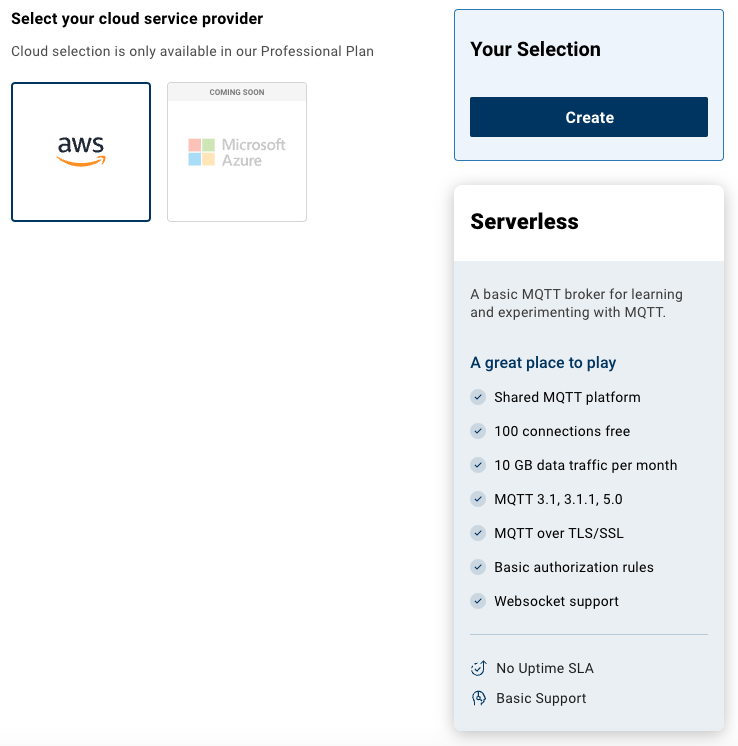
A page to select the cloud service provider where you want us to host your free HiveMQ Cloud cluster opens.
| Currently, the selection of a cloud service provider other than AWS is only available for the HiveMQ Cloud Professional and Enterprise plans. |
-
To start the creation of your free HiveMQ Cloud cluster, select Create in the Your Selection dialog.
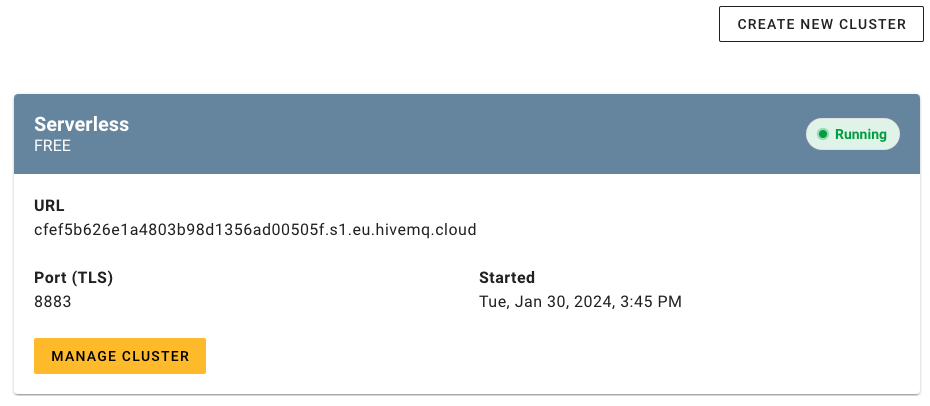
Within moments, your free HiveMQ Cloud cluster is running and ready.
-
To view cluster information and access the area where you define the credentials that your MQTT clients use to connect to the cluster, select Manage Cluster.
The Cluster Details overview for your HiveMQ Cloud Serverless cluster opens.
Cluster Details Overview - HiveMQ Cloud Serverless Free Plan
The Overview tab of the Cluster Details page outlines key information for the selected cluster.
| The information and actions available on the Overview tab of the Cluster Details page vary based on the HiveMQ Cloud plan type of the cluster. |
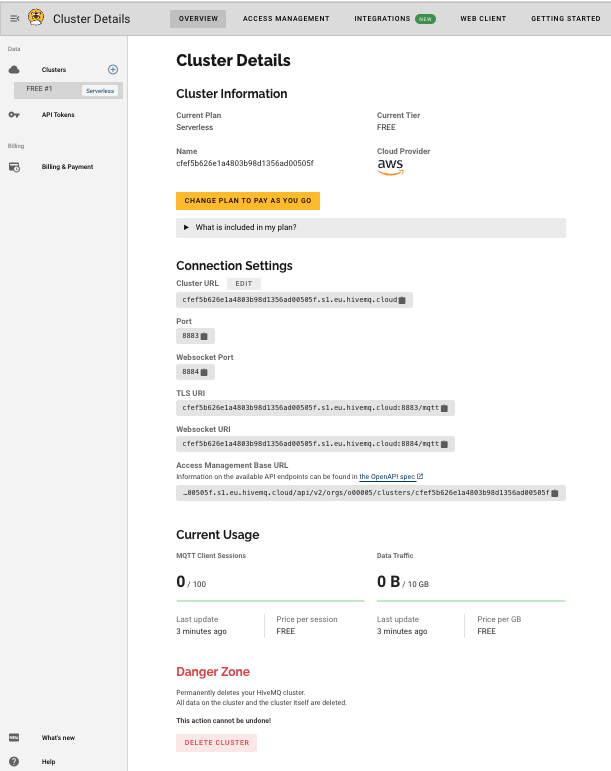
Cluster Information - HiveMQ Cloud Serverless Free Plan
| Item | Description |
|---|---|
Current Plan |
The type of HiveMQ Cloud package the cluster runs. The following cluster types are possible:
|
Current Tier |
The subscription model of the selected plan. The available tiers vary based on the type of plan. The following tiers are possible:
|
Name |
The identifier of the selected cluster. |
Cloud Provider |
The cloud service provider on which the HiveMQ Cloud cluster is located. The following providers are available:
|
Connection Settings - HiveMQ Cloud Serverless Free Plan
| Item | Description |
|---|---|
Cluster URL |
The unique URL of the cluster that HiveMQ generates automatically when the cluster is created. |
Port |
The secure port that your MQTT clients use to connect to your HiveMQ Cloud cluster. |
WebSocket Port |
The secure port that your MQTT clients use to connect to your HiveMQ Cloud cluster using WebSocket. |
Access Management Base URL |
Specifies the API base URL to use in calls to the HiveMQ Cloud REST API service. |
Available Actions - HiveMQ Cloud Serverless Free Plan
| Item | Description |
|---|---|
Change Plan to Pay as You Go |
Opens a dialog to upgrade your Free HiveMQ Cloud cluster to a Pay As You Go cluster (credit card required). It is not possible to downgrade your HiveMQ Cloud Pay As You Go to a Free HiveMQ Cloud cluster. |
What is included in my plan? |
Show the current plan type and available features for the selected HiveMq Cloud cluster. |
Cluster URL - Edit |
Opens a dialog where you can define a custom cluster URL for the selected cluster (Pay As You Go package only).
Maximum one change per 24-hour period. |
Delete Cluster |
After a confirmation request, this action permanently deletes the HiveMQ cloud cluster and all data on the cluster. This action cannot be undone. |
Contact Support |
Opens a dialog with resource links and access to the HiveMQ Support portal. |
Current Usage - HiveMQ Cloud Serverless Free Plan
| Item | Description |
|---|---|
MQTT Client Sessions |
The current number of MQTT connections used in this billing period and the maximum number of concurrent MQTT connections the selected HiveMQ Cloud Serverless cluster allows. Actual usage can vary slightly from the cluster capacity value shown. |
Data Traffic |
The current volume of data consumed in this billing period and the total volume of data the selected HiveMQ Cloud package includes per month. Actual usage can vary slightly from the cluster capacity value shown. |
-
To continue your setup with the getting started guide in this documentation, switch to the Access Management tab of your HiveMQ Cloud console and continue reading.
-
To proceed with step-by-step getting started instructions online, switch to the Getting Started tab of your HiveMQ Cloud console and follow the prompts.
Create Access Credentials - HiveMQ Cloud Serverless Free Plan
To connect MQTT clients to your cluster, you need to define the MQTT credentials that allow the clients to access the cluster.
-
To create an MQTT credential, enter a Username, Password, and Permissions level in the Access Credentials area of the Access Management tab of your HiveMQ Cloud cluster.
Select Create Credential to add the set of credentials.
The Access Credentials area adjusts to list all credentials that you create for the selected cluster.
|
You can add and delete MQTT credentials for your HiveMQ Cloud cluster as needed. |

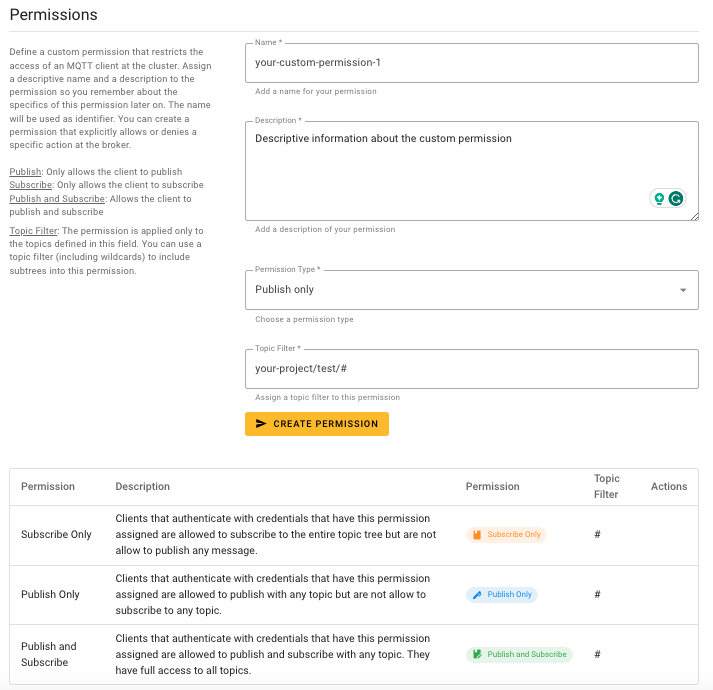
Add Topic Filter-based Permissions
If desired, you can define custom topic filter-based permissions for use in your access credentials. When you add an MQTT topic filter to a permission, the HiveMQ broker applies the defined permission level only to topics that match the configured topic filter.
-
To create a custom permission, enter a Name, Description, and Permission Type for the permission in the Permissions area of the Access Management tab. HiveMQ uses the name you assign as the permission identifier.
In the Topic Filter field, enter the MQTT topic filter to which the permission applies. The topic filter can include wildcards.
Select Create Permission to add the custom permission.
The Permissions area adjusts to display all available permissions (standard and custom).
| Keep the Credentials page of your cluster open. To complete the Pub/Sub test with the MQTT CLI procedure, you need the URL, port, and MQTT credential information from the Overview and Access Management tabs. |
Test Your HiveMQ Cloud Cluster
Once you create your MQTT credentials, you are ready to connect some MQTT clients and explore basic MQTT functionality.
This guide walks you through two ways to try out the connection to your HiveMQ Cloud instance:
Pub/Sub Test with the HiveMQ WebSocket Client
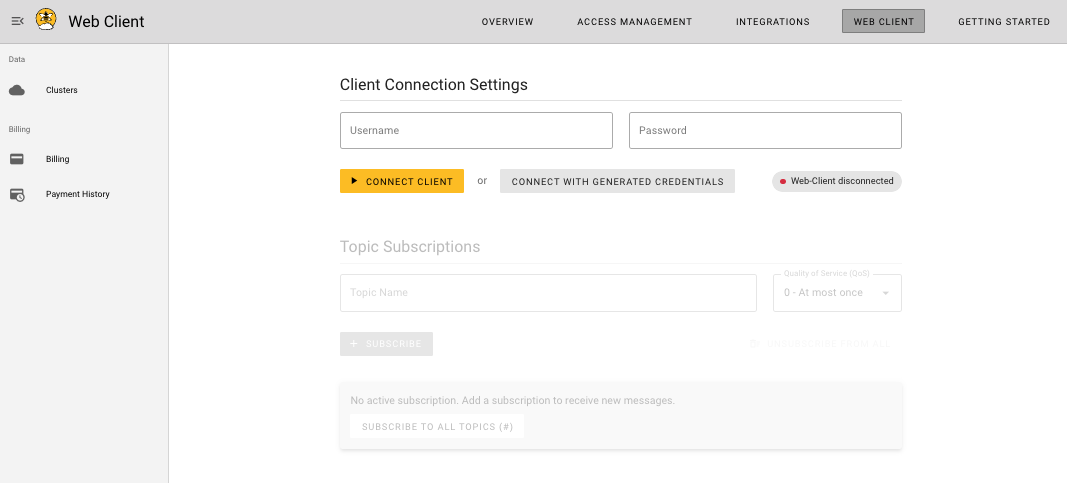
Your HiveMQ Cloud package also supports MQTT over WebSocket on port 8884. Once you create your HiveMQ Cloud cluster you can use the public HiveMQ WebSocket client to test the connection. The graphical view of the public WebSocket client provides a convenient way to explore and experiment with MQTT functionality.
Access the HiveMQ WebSocket Client
-
To get started with the HiveMQ WebSocket Client, switch to the Web Client tab of your HiveMQ Cloud cluster.
Connect to Your HiveMQ Cloud Instance
-
In the Client Connection Settings area, enter the set credentials you want to use for the web client connection.
You can use one of the Active MQTT Credentials listed on your Access Management tab or create a new set of automatically generated connection credentials.-
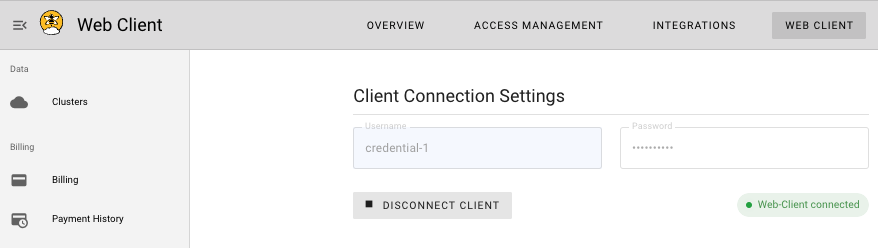
To connect with credentials that you previously created, enter one of your active credentials and select Connect Client to establish the connection.
The screen adjusts to show that the Web Client is connected.
-
To create and connect with automatically generated credentials, select the Connect with Generated Credentials option.
A dialog opens with your autogenerated username and password.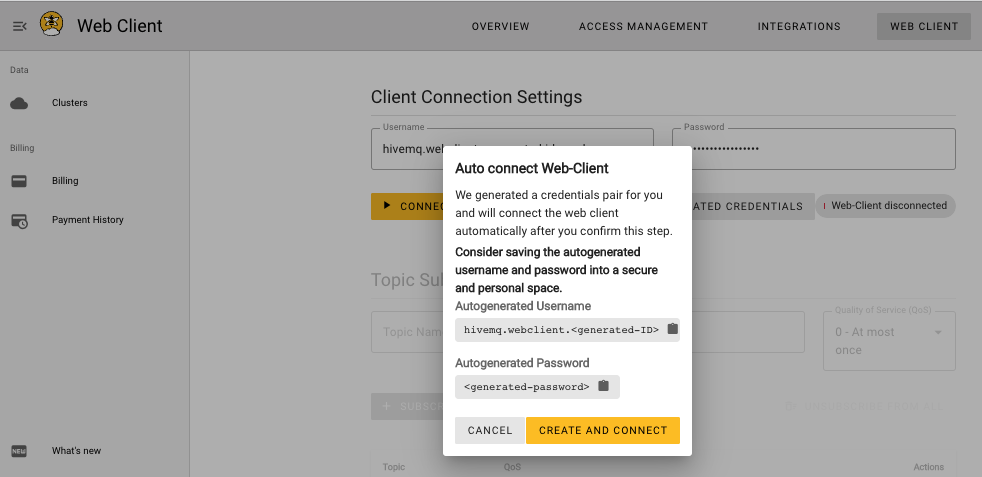
Record your new credential information in a secure location, and select Create and Connect to establish the connection.
-
Pub/Sub Test with the HiveMQ Web Client
-
In the Topic Subscriptions area, enter a topic name and select a Quality of Service (QoS) level for the subscription. The default QoS level is 0.
To add the subscription, select Subscribe.
To subscribe to additional topics, repeat the process.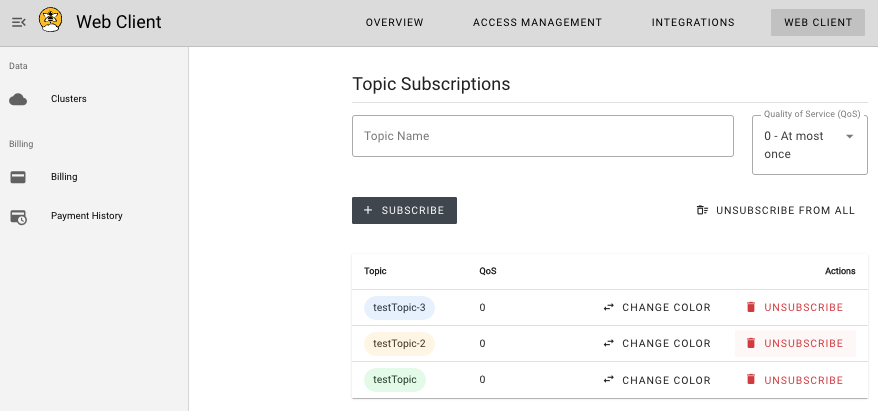
If desired, use the Change Color option to color code the subscription with a color of your choice.
-
In the Publish Message area, enter the destination topic, the desired message payload, and quality of service level (QoS). The default QoS level is 0.
To publish the message to your HiveMQ Cloud instance, select Publish.
The message payload, topic, QoS level, and timestamp of each message sent to the Web Client on the defined subscriptions display immediately.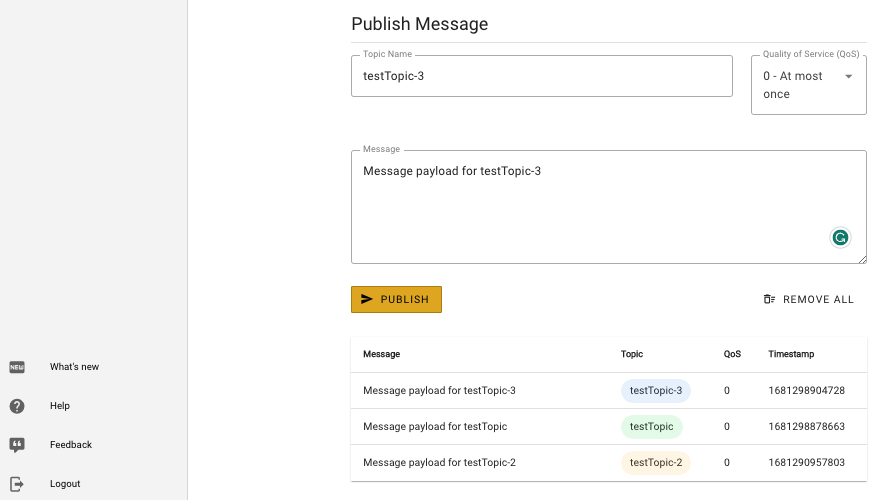
For more information on MQTT over WebSockets, see the HiveMQ MQTT Essentials special edition on WebSockets.
Pub/Sub Test with the MQTT CLI
|
We use the MQTT CLI for ease of use and to simplify the explanation of this example procedure.
However, you are free to use whichever tool and method you prefer. For instructions with other tools, check the tooling information listed on the Getting Started tab of the Cluster Details page of your HiveMQ Cloud console. |
Connect an MQTT Client
-
To start the MQTT CLI in shell mode, open a terminal window and enter the following command:
mqtt sh
The MQTT CLI starts and displays a list of useful options and commands. . To connect to your HiveMQ Cloud cluster, type the following command with the appropriate information from your Clusters page and press enter:
+
con -h <cluster-url> -p <port-number> -s -u <mqtt-credentials-username> -pw <mqtt-credentials-password>Information about the HiveMQ Cloud connection displays.
This is your first connected MQTT client.
|
HiveMQ Cloud only allows secure TLS connections.
Adding an -s flag to the connect command opens a secure connection to the MQTT Broker with the default SSL configuration. |
+ . To create another connected client and test your cluster, open a second terminal window (keep your original terminal window open) and enter the following command once more:
+
mqtt sh-
Copy and paste the connection command that you created in the first window to the second window and press enter.
Information about the second HiveMQ Cloud connection displays.
This is your second connected MQTT client.
Publish/Subscribe Test
-
In the terminal window of the second MQTT client, enter:
sub -t testTopic -s
This command subscribes the second MQTT client to all messages that are published to the topic testTopic.
+
| In shell mode, adding the -s flag to the command blocks the MQTT CLI console so that the incoming messages are printed out to the user. |
+
-
In the first terminal window, enter:
pub -t testTopic -m Hello
This command makes the first MQTT client a publisher and publishes the message Hello with the topic testTopic.
The message Hello appears immediately in the terminal window of the second MQTT client.
-
To publish another message, enter the following command in the first terminal window:
pub -t testTopic -m Goodbye
This command publishes the message Goodbye with the topic testTopic.
The message Goodbye appears immediately in the terminal window of the second MQTT client.