Security Features of HiveMQ
HiveMQ is designed from the ground up with maximum security in mind. For mission-critical IoT and M2M scenarios, secure end-to-end encrypted communication and advanced authentication and authorization features are essential. HiveMQ gives you the flexibility to enable the specific security features that your individual use case requires.
| If you are unfamiliar with MQTT security concepts, we recommend reading our MQTT Security Fundamentals blog series. |
Authentication & Authorization in HiveMQ
HiveMQ handles authentication and authorization via security extensions. You can download security extensions from the HiveMQ Marketplace or develop your own security extension.
Since version 4.3, HiveMQ only allows MQTT clients to connect if a security extension is present.
For testing purposes, HiveMQ includes a hivemq-allow-all-extension that authorizes all MQTT clients to connect to HiveMQ.
Before you use HiveMQ in production, you must add an appropriate security extension and remove the hivemq-allow-all-extension.
|
TLS
Transport Layer Security (TLS) is a cryptographic protocol that allows secure and encrypted communication at the transport layer between a client application and a server. If a TLS listener is enabled in HiveMQ, each client connection for that listener is encrypted and secured by TLS.
|
Multiple listeners
You can configure HiveMQ with multiple listeners so HiveMQ can handle secure and insecure connections simultaneously.
For more information, see HiveMQ MQTT Listeners.
|
For usage scenarios where sensitive information is published via MQTT, we strongly recommend that you enable TLS. When TLS is configured correctly, it is very difficult for an attacker to break the encryption and read the packets on the wire. Since TLS is a proven technology and the whole transport is encrypted, TLS can be a better choice than hand-rolled payload encryption when security is more important for your scenario than package overhead.
As in most cases, added security comes with some disadvantages. The most important disadvantage of using SSL/TLS is the potential for a significant increase in CPU and communication overhead. The SSL handshake that takes place when a connection is established adds additional overhead in terms of bandwidth and computation resources. While the added CPU usage is typically negligible on the broker, it can be a problem for very constrained devices that are not designed for computation-intensive tasks. If your deployment relies on unreliable connections that frequently drop, increased overhead is an important consideration. For more information, see TLS/SSL - MQTT Security Fundamentals.
Java Key and Trust Stores
For information on how to create a key store, see HiveMQ Platform How-Tos.
|
Autoreload
HiveMQ reloads key and trust stores during runtime.
You can add or remove client certificates from the trust store or change the server certificate in the key store without any downtime.
If the same master password is used, you can even replace the key store and trust store file.
|
Communication Protocol
When no explicit SSL/TLS version is set, HiveMQ automatically uses one of the two default-enabled protocols to secure the communication between HiveMQ and the client, based on which version the client supports. TLSv1.2 or TLSv1.3 are recommended because these protocols tend to be more secure.
The default tls-tcp-listener configuration of HiveMQ enables the following TLS protocols by default:
TLSv1.3
TLSv1.2
| Due to security concerns, the OpenJDK Java platform no longer enables TLSv1 and TLSv1.1 by default. As a result, Java applications such as HiveMQ that use TLS to communicate now require TLS 1.2 or above to establish a connection. The change applies to at least OpenJDK 8u292 onward, OpenJDK 11.0.11 onward, and all versions of OpenJDK 16. TLSv1 and TLSv1.1 are not removed from OpenJDK, only the default availability changes. If you still need to support TLSv1 or TLSv1.1, you must explicitly enable them in the TLS version configuration of your HiveMQ listeners (see example explicit HiveMQ TLS configuration). |
To enable only specific protocols, you can use an explicit TLS configuration that is similar to the following example. If necessary, you can also use such an explicit configuration to enable legacy protocols such as TLSv1 and TLSv1.1:
<?xml version="1.0"?>
<hivemq xmlns:xsi="http://www.w3.org/2001/XMLSchema-instance">

    ...
    <listeners>
        ...
        <tls-tcp-listener>
            <tls>
                ...
                <!-- Enable specific TLS versions manually -->
                <protocols>
                    <protocol>TLSv1.2</protocol>
                </protocols>
                ...
            </tls>
        </tls-tcp-listener>
    </listeners>
    ...
</hivemq>
Cipher Suites
TLS can only be as secure as the used cipher suites. Usually, JVM vendors make sure that only secure ciphers are activated by default. However, in some cases, you may want to limit HiveMQ to use specific cipher suites you are comfortable with.
By default, the following cipher suites are enabled:
TLS_ECDHE_ECDSA_WITH_AES_256_GCM_SHA384
TLS_ECDHE_ECDSA_WITH_AES_128_GCM_SHA256
TLS_ECDHE_RSA_WITH_AES_128_GCM_SHA256
TLS_ECDHE_RSA_WITH_AES_128_CBC_SHA
TLS_ECDHE_RSA_WITH_AES_256_CBC_SHA
TLS_RSA_WITH_AES_128_GCM_SHA256
TLS_RSA_WITH_AES_128_CBC_SHA
TLS_RSA_WITH_AES_256_CBC_SHA
| AES256 requires JCE unlimited strength jurisdiction policy files. |
If none of the default cipher suites are supported, the cipher suites that your JVM enables are used.
|
List of cipher suites
To view a list of available cipher suites for the Oracle JVM, see Oracle JCA documentation.
|
The list of cipher suites that are enabled by default can change with any release. If you depend on specific cipher suites, specify the cipher suites explicitly.
<?xml version="1.0"?>
<hivemq xmlns:xsi="http://www.w3.org/2001/XMLSchema-instance">

    ...
    <tls>
        ...
        <!-- Only allow specific cipher suites -->
        <cipher-suites>
            <cipher-suite>TLS_RSA_WITH_AES_128_CBC_SHA</cipher-suite>
            <cipher-suite>TLS_RSA_WITH_AES_256_CBC_SHA256</cipher-suite>
            <cipher-suite>SSL_RSA_WITH_3DES_EDE_CBC_SHA</cipher-suite>
        </cipher-suites>
        ...
    </tls>
    ...
</hivemq>
Each TLS listener can be configured to have its own list of enabled cipher suites.
Native SSL
HiveMQ comes prepackaged with an OpenSSL implementation called BoringSSL that is maintained by Google and can be activated on Linux or macOS.
To enable HiveMQ Native SSL, use a configuration similar to the following:
<?xml version="1.0"?>
<hivemq xmlns:xsi="http://www.w3.org/2001/XMLSchema-instance">

    ...
    <listeners>
        ...
        <tls-tcp-listener>
            <tls>
                ...
                <native-ssl>true</native-ssl>
                ...
            </tls>
        </tls-tcp-listener>
    </listeners>
    ...
</hivemq>
Due to security concerns and to align with the OpenJDK Java Platform, from HiveMQ 4.7 onwards, HiveMQ only enables the following TLS protocols by default for native SSL:
-
TLSv1.3
-
TLSv1.2
If you still need to support legacy TLS versions such as TLSv1 or TLSv1.1 for your Native SSL implementation, you must now explicitly enable the versions in your tls-tcp-listener configuration:
<?xml version="1.0"?>
<hivemq xmlns:xsi="http://www.w3.org/2001/XMLSchema-instance">

    ...
    <listeners>
        ...
        <tls-tcp-listener>
            <tls>
                ...
                <!-- Enable legacy TLS versions manually -->
                <protocols>
                    <protocol>TLSv1.1</protocol>
                </protocols>
                <native-ssl>true</native-ssl>
                ...
            </tls>
        </tls-tcp-listener>
    </listeners>
    ...
</hivemq>
If native SSL is not supported on your platform, HiveMQ performs a graceful fallback to the SSL implementation of your JVM.
| If you only configure cipher suites that are available in OpenSSL but not in JVM SSL, it can happen that your broker has no matching cipher suites for any client and the initialization of a connection is not possible. |
The main advantage of using native SSL lies in its increased performance compared to standard JVM SSL.
Another benefit is the availability of additional state-of-the-art cipher suites like a stronger AES with GCM, the CHACHA20 stream cipher, and additional cipher suites with elliptic curve algorithms.
| If native SSL is enabled, the communication protocol SSLv2Hello can not be disabled. |
| Cluster transport TLS connections cannot use the Native SSL implementation. |
Randomness
If it is available, HiveMQ uses /dev/urandom as the default source of cryptographically secure randomness.
/dev/urandom is generally considered secure enough for almost all purposes [1] and has a significantly better performance than /dev/random.
If desired, you can revert to /dev/random for your random number generation:
-
Delete the line that starts with the following information from your
$HIVEMQ_HOME/bin/run.shfile if you start HiveMQ manually or the-Djava.security.egd=file:/dev/./urandomoption from the configuration file of the init service of your choice.JAVA_OPTS="$JAVA_OPTS -Djava.security.egd=file:/dev/./urandom"
OCSP stapling
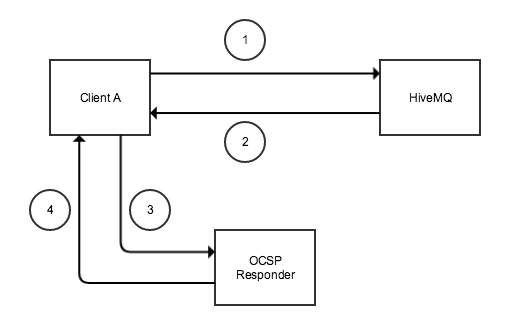
The Online Certificate Status Protocol (OCSP) allows an OCSP responder to determine the revocation status of an SSL certificate. OCSP is frequently used as an alternative to certificate revocation lists (CRL) because OCSP contains less information than a classic CRL and requires less network traffic. The smaller amount of data that needs to be parsed enables more lightweight clients.
In client-driven OCSP, each client requests status information directly from the OCSP responder and requires a response for every certificate to be checked. When many clients use client-driven OCSP, the large number of requests to the OCSP responder can cause the OCSP responder to become a performance bottleneck.
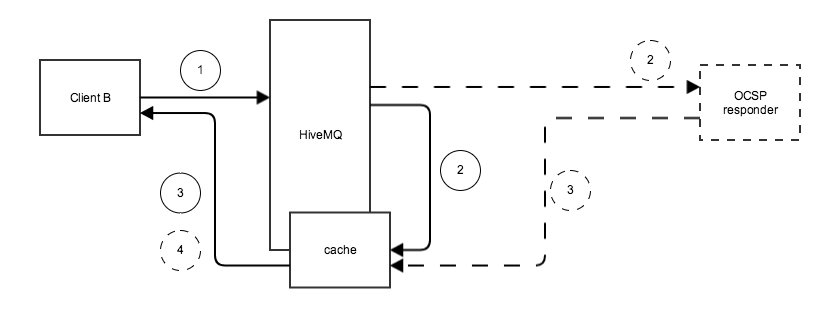
OCSP stapling allows the HiveMQ broker, rather than the client, to make the status request to the OCSP responder. The HiveMQ broker regularly obtains an OCSP response about its own certificate from the OCSP responder, caches the response, and sends it directly to the client in the initial TLS handshake. The client does not need to connect to the OCSP responder directly.
OCSP stapling significantly reduces the load on the OCSP responder, since a single request per validity period is sufficient. A request per individual client is no longer necessary.
The caching interval defines how frequently the HiveMQ broker sends requests for new status information.
Between requests, the HiveMQ broker caches the last status that was received.
If the OCSP responder is not available, HiveMQ temporarily reduces the cache interval to 15 seconds to get status information as soon as possible.
Once a successful OCSP response is received, the interval automatically reverts to the configured value.
If the HiveMQ broker does not receive a valid response within 30 minutes, the cached response is cleaned up and no OCSP response is sent to the client.
However, HiveMQ continues to try to establish a connection with the OCSP responder.
HiveMQ initiates requests for status information to the OCSP responder in the following cases:
-
When a TLS listener starts
-
When the configured cache interval expires
-
When a client requires status information and the response is not yet cached
-
If the cached response expires and a new TLS connection is established
OCSP stapling properties
The <ocsp-stapling> element has the following properties:
| Name | Default | Mandatory | Description |
|---|---|---|---|
|
|
|
Enables OCSP stapling. |
|
|
|
Overrides the URL of the OCSP Responder contained in the server certificate. An override URL must be set if no OCSP URL information is included in the server certificate. |
|
|
|
Interval in seconds to cache the OCSP response on the server side from the OCSP stapling responder. |
OCSP stapling configuration
The following configuration enables OCSP stapling for a TLS TCP listener:
<?xml version="1.0"?>
<hivemq xmlns:xsi="http://www.w3.org/2001/XMLSchema-instance">

    <listeners>
        ...
        <tls-tcp-listener>
            <port>8883</port>
            <bind-address>0.0.0.0</bind-address>
            <tls>
                <keystore>
                    <path>/path/to/the/key/store.jks</path>
                    <password>password-keystore</password>
                    <private-key-password>password-key</private-key-password>
                </keystore>
                <native-ssl>true</native-ssl>
                <ocsp-stapling>
                    <enabled>true</enabled>
                </ocsp-stapling>
            </tls>
        </tls-tcp-listener>
        ...
    </listeners>
</hivemq>|
Preconditions
OCSP stapling is disabled by default.
To use OCSP stapling you must set <native-ssl> and <ocsp-stapling><enabled></ocsp-stapling> to true.
|
The following configuration enables OCSP stapling for a TLS TCP listener with a custom cache-interval and override-url:
<?xml version="1.0"?>
<hivemq xmlns:xsi="http://www.w3.org/2001/XMLSchema-instance">

    <listeners>
        ...
        <tls-tcp-listener>
            <port>8883</port>
            <bind-address>0.0.0.0</bind-address>
            <tls>
                <keystore>
                    <path>/path/to/the/key/store.jks</path>
                    <password>password-keystore</password>
                    <private-key-password>password-key</private-key-password>
                </keystore>
                <native-ssl>true</native-ssl>
                <ocsp-stapling>
                    <enabled>true</enabled>
                    <override-url>http://your.ocsp-responder.com:2560</override-url>
                    <cache-interval>3600</cache-interval>
                </ocsp-stapling>
            </tls>
        </tls-tcp-listener>
        ...
    </listeners>
</hivemq>
Audit Log
The audit log provides a single, unified log for tracking auditing-relevant data. This log has several use cases:
-
You can access an overview of all actions that are performed.
-
You can satisfy legal and compliance requirements.
-
You can use intrusion-prevention software to secure your HiveMQ cluster.
-
You know precisely who had access to which information and when the access occurred.
Audit Log Configuration
The audit log is enabled by default. It can be disabled in the HiveMQ configuration file.
HiveMQ Audit Log File
By default, the audit log is written to <HiveMQ Home>/audit/audit.log.
You can customize the folder of the audit log with the HIVEMQ_AUDIT_FOLDER environment variable or the hivemq.audit.folder system property.
See the section about manually setting specific HiveMQ folders for more information.
| The audit log contains sensitive information. Be sure to set the filesystem permissions of the audit folder accordingly. |
The audit log provides automatic log file rolling.
Once per day at midnight, the old audit log files are archived with the filename audit.<yyyy-MM-dd>.log.
For example, after two days of operation, the audit folder contains the following files:
├─ audit.2019-07-22.log
├─ audit.2019-07-23.log
└─ audit.log
| HiveMQ never deletes the audit log files that are archived. If you need to remove old audit logs regularly, you must take additional action. For example, set up a scheduled cron job to alleviate data protection concerns or storage constraints. |
HiveMQ Audit Log Statement
Statements in the audit log have the following structure:
<time><time zone> | user:"<user name>" | IP:"<host address>" | node:"<node name>" | <event>
| Log argument | Description |
|---|---|
|
Shows the time when the event happened. The time format is: |
|
Shows the offset of the time zone in which the event happened compared to UTC. The format is: |
|
The User login that triggered the event. |
|
The IP address from which the user connected. The address can be in IPv4 or IPv6 format. |
|
The identifier of the HiveMQ cluster node on which the event occurred.
This name is logged at the start of HiveMQ in the |
|
The type of event and additional information for the event. For a list of all events, see Available HiveMQ Audit Log Events. |
Available HiveMQ Audit Log Events
The following events are listed in the audit log:
| Event | Additional Information |
|---|---|
Login attempt failed |
|
Log in successful |
|
Session timed out |
|
Logged out |
|
Refreshed clients snapshot |
|
Created trace recording |
Trace recording name, start time, end time, client filters, topic filters, and packet filters |
Stopped trace recording |
Trace recording name |
Downloaded trace recording |
Trace recording name |
Deleted trace recording |
Trace recording name |
Refreshed clients snapshot |
|
Added subscription |
Topic filter, QoS, and client ID |
Removed subscription |
Topic filter, and client ID |
Forced client disconnect |
With/without will massage and client ID |
Forced session delete |
Client ID |
Created new backup |
|
Downloaded backup file |
Backup file name |
Deleted backup file |
Backup file name |
Started import of backup file |
Backup file name |
Backup aborted |
|
Cleared dropped message statistics |
|
Inspected password |
Client ID |
Inspected will payload |
Client ID |
Inspected TLS certificate |
Client ID |
Inspected proxy protocol TLVs |
Client ID |